


How to shop at a farmer's market
And tips for using random CSA vegetables!

If you’re in Kitchener-Waterloo, I am making my very gay beet salad on Wednesday at Legacy Greens. It will be available in the fridge: $5.99 for a single serving and $9.99 for a large container. You may be asking, why make gay salad in July – wasn’t Pride month last month? Pride is every day of the year in your heart! You need to love yourself 365 days of the year, and what better way to love yourself than by eating some delicious vegetables?
Groceries, especially at the big box stores, have become irrationally expensive.
Over the last few years I’ve started grocery shopping in a different way that helps me save money and eat better food:
I subscribe to a Community-Share Agriculture (CSA) box – this year I am getting produce from Lucky Bug Farm, which I pick up every Thursday directly from Aliyah, the farmer. In past years I got the Legacy Greens Wednesday Box which is local produce as well, Jordan sources the products from many local farms.
I go to the Kitchener Farmer’s Market on Saturdays to get any additional produce and other groceries that I need.
I go to Legacy Greens and Full Circle Foods, both independent grocery stores, for any other items I need (a 5 minute walk from the Market!) and to Vincenzo’s for specialty products.
I subscribe to eggs from a regenerative farm (Provenance Farms) and buy regeneratively farmed butter online (St. Brigid’s Creamery).
I like shopping this way because it puts produce and food quality at the centre of my cooking and meal planning. It’s much more affordable – I spend half what I used to at the big box grocery stores. It’s healthier. The produce is fresher and better quality, often more unique and fun. The savings help me spend a bit more on better quality meat, eggs, and dairy from regenerative farms.
But shopping at a farmer’s market can be overwhelming if you’re used to shopping at a big box store: how do you translate grocery shopping to a market? What do you do with all this weird produce? How do you know what’s worth buying? And how do you go through all this produce before it goes bad?
Why shop at a farmer’s market?
Farmer’s markets are great ways to get the best produce, find unique products, support local producers, save money, and eat healthier.
You can just go to the farmer’s market with no planning – I do that all the time – but when I’m organized it sets me up for having a great week of delicious food.
This article covers a few key times in your market shopping journey to set you up for success before, at, and after the farmer’s market.
Before you leave the house
At the farmer’s market
When you get home
How to find recipes for weird produce
Recipes I made this week


A great market bag is key to a successful trip. The Responsible Adults Friendship Club market bag is available to order on my website! It's big! It's strong! It has pockets for money and shopping lists! And it's machine washable!


Before you leave the house
Make sure you have everything you need:
Bring your bags or a granny wagon!
Bring a cooler if you are buying meat and cheese!
Bring cash!
Bring a shopping list if you’re a shopping list person!
Bring a friend!
Buy coffee when you get there!
Two kinds of shoppers
Meal planners: If you are a meal planning, shopping list person (I am not), then make your list before heading out the market and get what’s on your list!
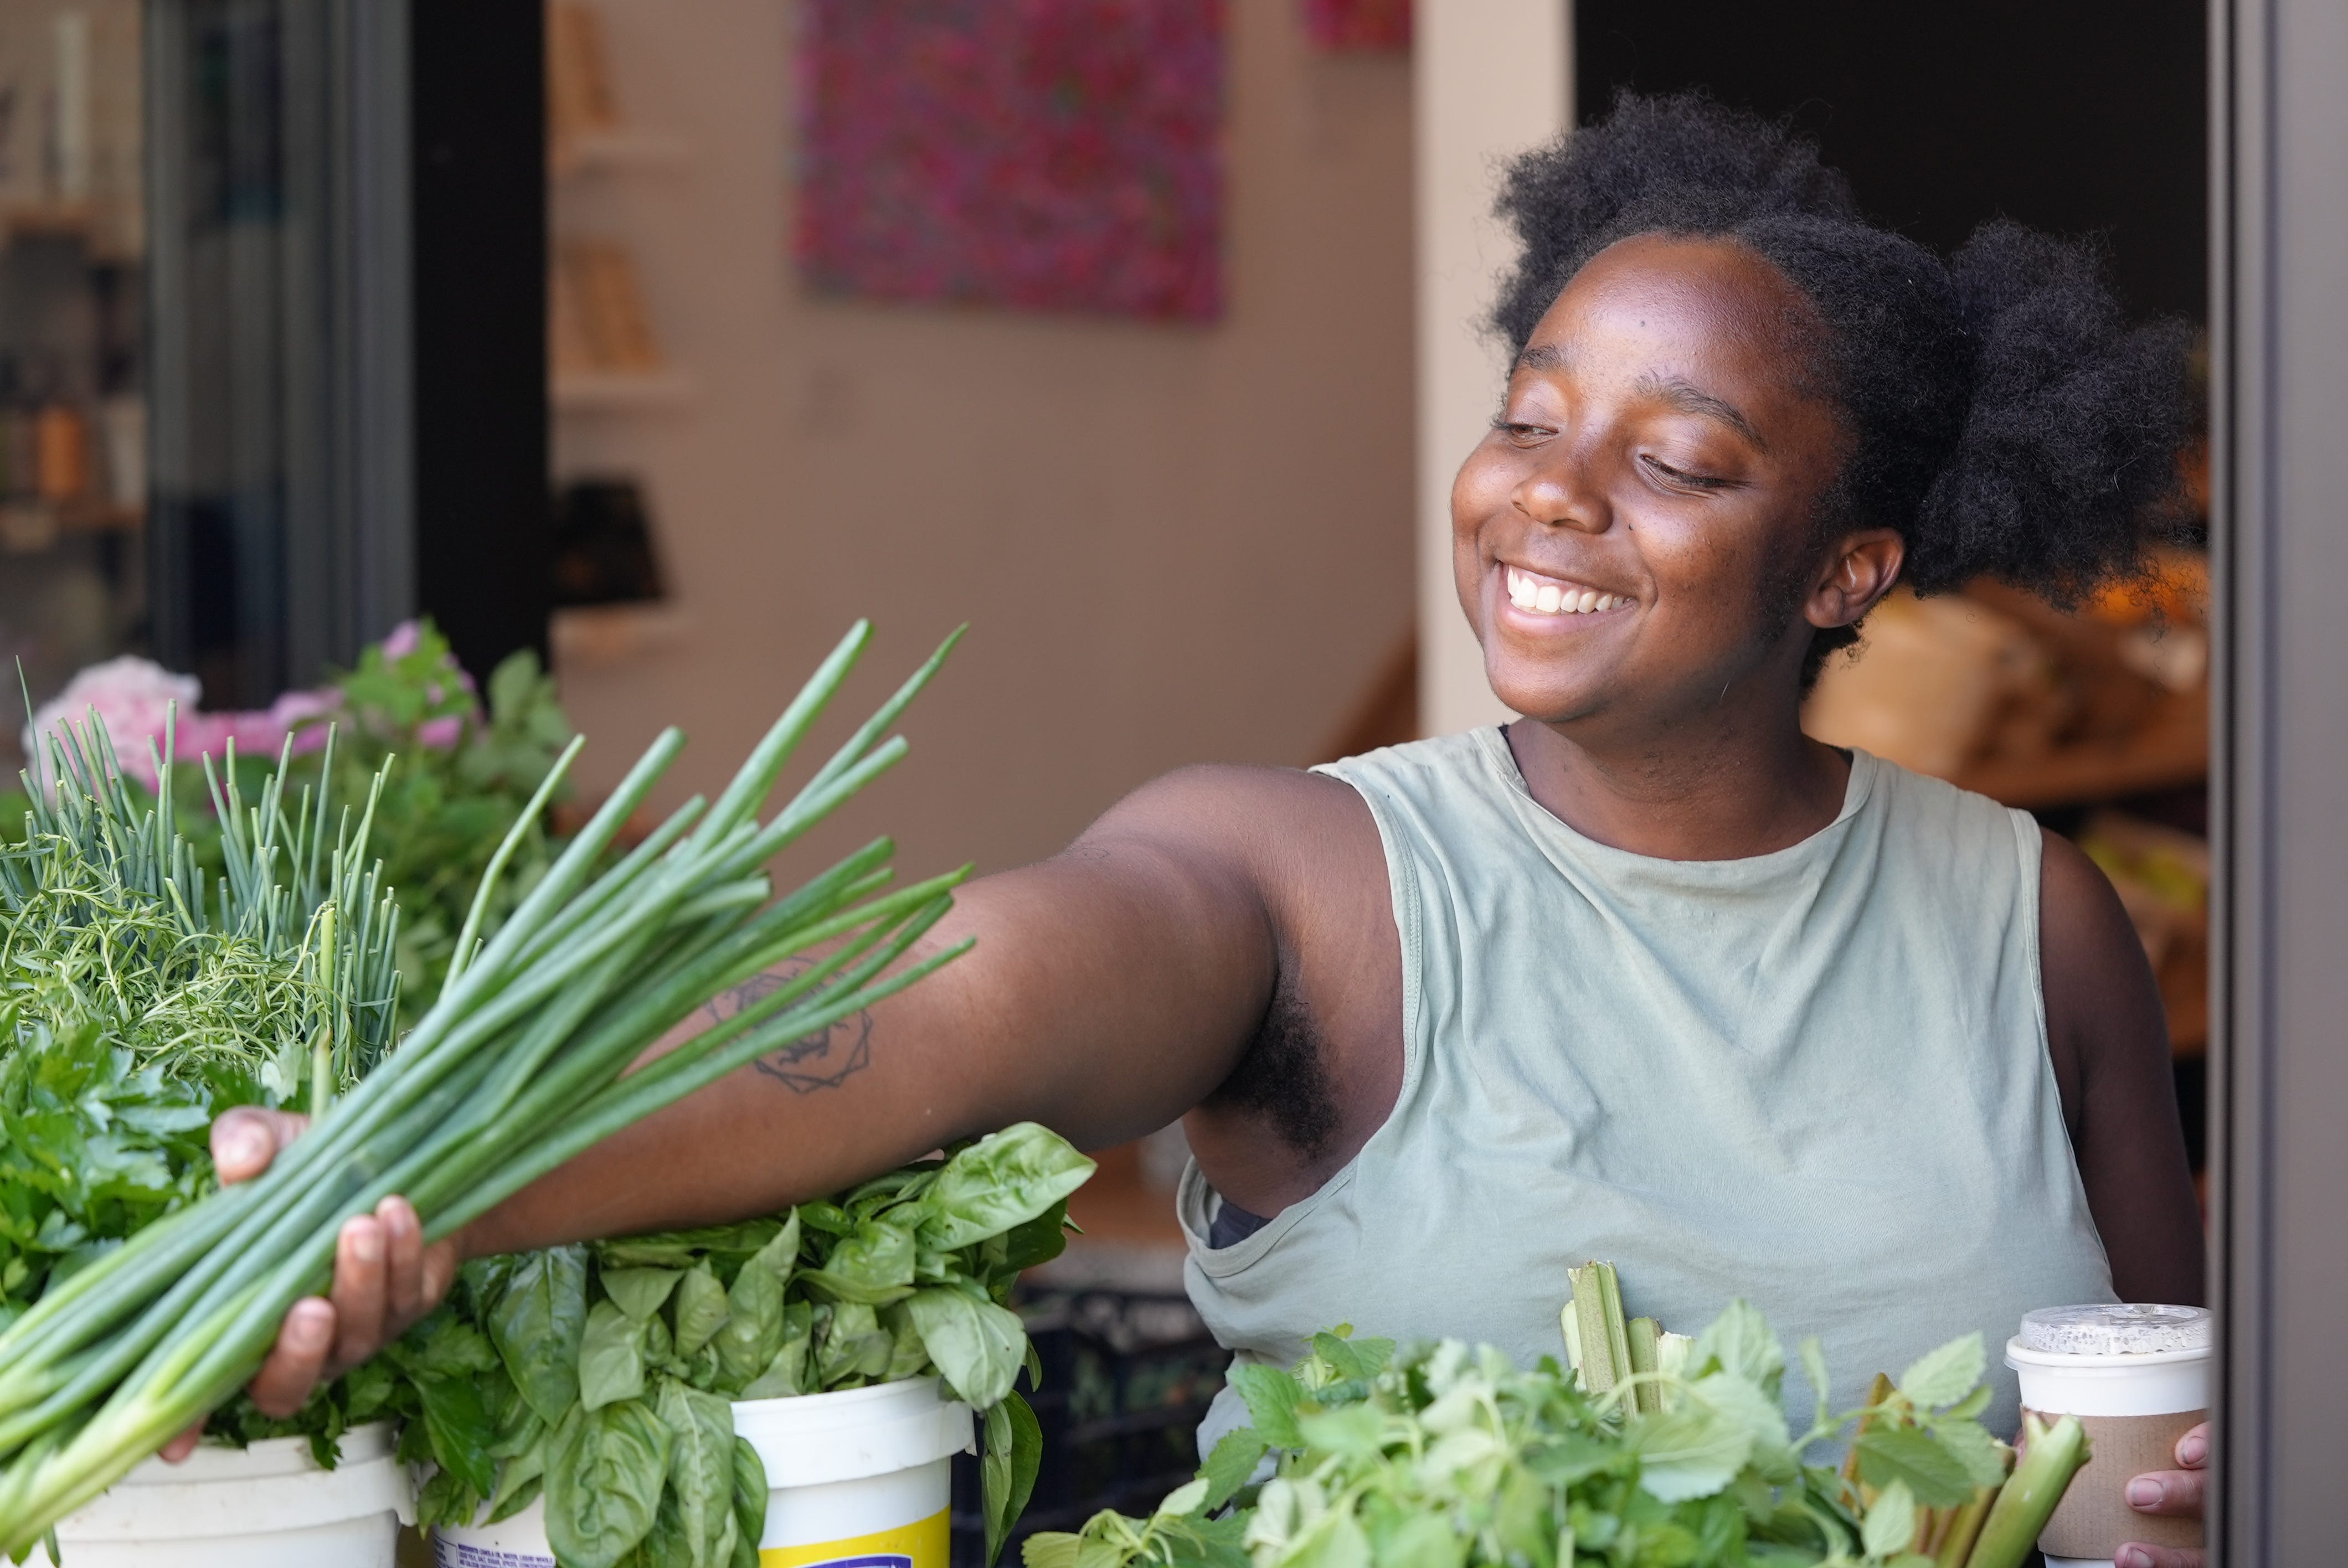
Improv cooks: I tend to follow my heart by buying whatever produce looks good and work backwards from there. Today I bought chanterelle mushrooms (never used them before!), green onions, garlic, broccoli, kohlrabi, and a steak. In my CSA box I got flowering chives, garlic scapes, lettuce, radishes, rhubarb, bok choy, and savoury (an herb).
From here I decided I would grill a steak with garlic scapes, served with chanterelle mushrooms cooked in onions, butter, and cream – so I needed a steak and cream. I turned the chives into chive blossom vinegar, and made cheddar and chive scones – I needed to buy cheddar. I made a simple salad with the lettuce. I buttered the radishes (seriously, it’s delicious and the recipe is below). I don’t know what I’ll do with the broccoli or kohlrabi yet, probably eat them with hummus? So I need chickpeas and tahini and lemons. All stuff I can find at the market or Legacy Greens!
And of course I need to make a strawberry rhubarb pie.
Plan your day to include before and after the market
Yes, you can “run to the market” if you are grabbing a few things. But if you’re doing a big produce haul, it’s important to factor in how you’re going to handle everything when you get home.
Clean your fridge before you go
You can be prepared, and empty your fridge of dead and dying produce before you go to the market – when your counters are empty and your stress is low. Or you can empty your fridge when your counters are full of all the new produce you just bought, and everyone is tired and hungry and late for some event. And then you shove your brand new beautiful raspberries onto your dead and dying spinach and wonder why they’re covered in mold the next day.
Cleaning your fridge before you go sets you up for success. It helps you determine what you actually have. It should only take 5 minutes. A hack job is better than no job, save the perfectionism for when people are visiting.
If you have two produce drawers, consolidate everything into one drawer and leave one empty for your new produce. I like to wash the produce drawer with soap and water so it’s clean to put clean produce into.
Empty your sink
I like to wash my produce immediately when I get home, before it goes in the fridge. I explain why below. To make this easier, I empty out my sink before heading to the market.

At the market
Go early or go late (or anytime)
Depending on when you go the market, you can prioritize different needs. The Kitchener Market, where I go, is open from 7am to 2pm:
When markets open – here that’s 7am – they aren’t super busy. Only the early birds and the chefs are there. You have your top pick of the most diversity of produce and highest quality of produce. If you want to the best, go early.
From 10am–12pm is the busiest time. It is chaos. There will be lines. There will be crowds.
Just before close – here that’s around 1:45 (the market closes at 2) – you’ll start to see vendors packing up. In the peak of summer you will be able to get deals on highly perishable produce like berries and tomatoes. I once got an entire flat (12 pints!) of strawberries for $10. It’s cheaper for the farmer to discount it than to compost it. However, it’s a gamble – they may sell out before closing time or you will only be left with bad produce.
Do a walk around before you buy
Depending on the size of your farmers market (and the amount of humans you’re corralling), I would recommend doing a quick scoping loop around the market before you start buying.
There’s a few reasons for this:
You might find a better deal if there are specific products you want – today I found a vendor selling 5 pints of strawberries for $10, and they were good strawberries. Across the hall was 1 pint for $5 and they were not good. It pays to do a walk-around. Often the price is based on how much product the farmer has to move.
Another vendor might have better quality or more unique produce – there are several places to buy mushrooms at the Kitchener Market, but only Fresh & Tasty Mushrooms had chanterelles and morels today.
You might get inspired to create specific meals, which mean you’ll add things to your list as you go – which is what happened to me once I get chanterelles.
Ask the vendors what’s good
It can feel intimidating for the anxious and introverted among us (hi) to ask the vendors questions – are you holding up the line? Why is this aggressive person leaning over me? But you can, and should, ask the vendors questions. The good vendors will enjoy that people care about their produce.
Most farmers want to sell you their best products, not just the products they have to move. Here’s a few questions you can ask them:
“What’s in season this week?” (Kohlrabi)
“Is there anything new you suggest I try?” (Garlic scapes)
“I’ve never had cinnamon cap mushrooms before, how would you cook them?” (Risotto)
“What goes best with garlic scapes?” (Steak, why not grab one from Dave Rogers’ booth?)


Pick the best produce
You are allowed to touch the produce, smell the produce, and sometimes (but not always) you can ask them for samples if you want to taste it (highly recommended if you want the best strawberries).
Learn how to pick ripe produce
When you are trying to pick ripe produce it helps to touch and smell things.
Tender herbs, like dill, mint, or basil, should be bright and perky and firm. Avoid soft and limp herbs or if they are going black at the edges. Herbs should smell strong. Woody herbs, like rosemary, should be tender and mostly leaves.
Lettuces and other greens should be firm and crisp. The leaves should stand stall and upright. Avoid greens that are limp, soft, and turning dark at the edges.
Brassicas, like radicchio, endive, and cabbage, should have smooth leaves. If the leaves begin to look wrinkled/shriveled, or have holes in the, they should be avoided.
Fruits should be heavy for their size – heavy means they are full of juice. Large strawberries may look appealing, but they are often mealy and hollow. This is true for any fruit from apples, to lemons, to berries, to tomatoes.
Fruits should smell like themselves – a tomato that smells like a tomato will taste like a tomato. Same for strawberries. You must be able to smell them from a distance!
Roots, like radishes, beets, potatoes, and carrots, should be very firm. Look for produce with the tops still attached – they should be firm and bright. If the tops are limp and soft they should be discarded.
Try new produce
Seasonal and heirloom produce is often the best tasting, but often overlooked because it’s not what people are familiar with. For example, look for the following. If you see something you don’t know, ask the vendor about.
Here is a non-exhaustive list!
Spring
Fiddleheads (the flowering stem of ferns!)
Morel mushrooms (the flowering part of a mushroom! They only grow in the wild for a few weeks in Spring!)
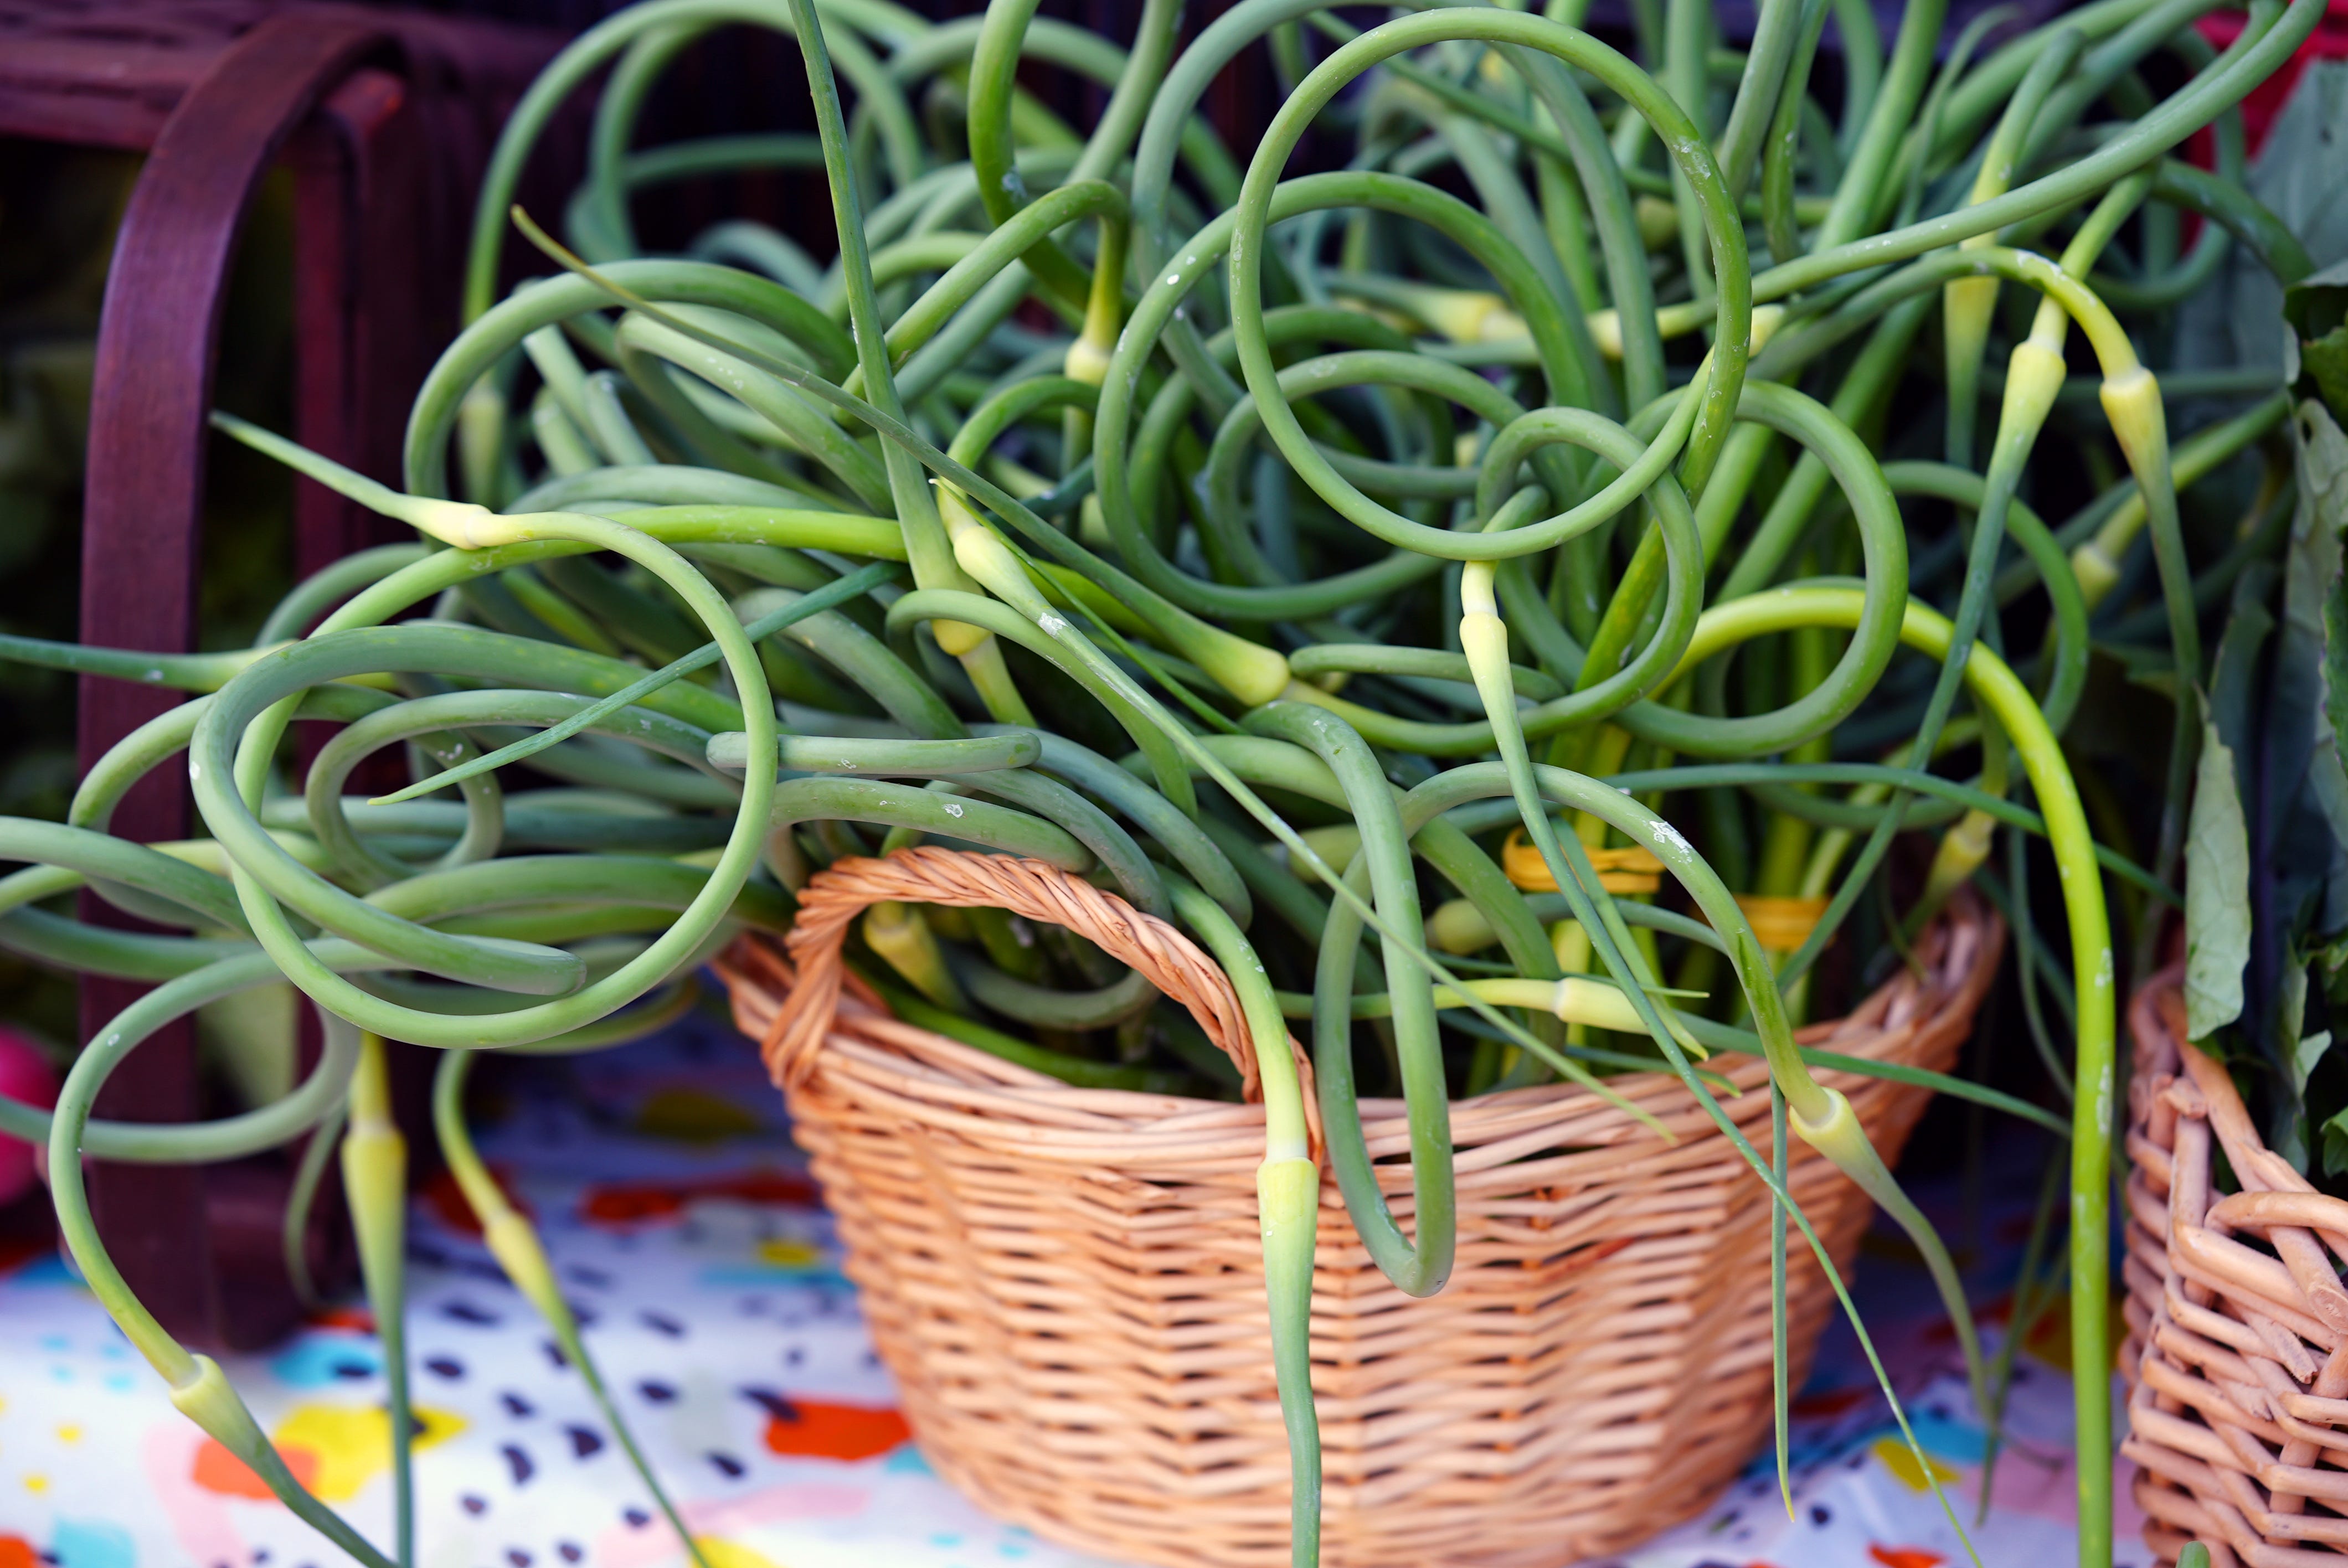
Garlic scapes (the flowering stem of the garlic plant before it flowers!)
Flowering chives (more flowers!)
Squash blossoms (more flowers!)
Edible flowers like lavender!
Summer
Heirloom garlic varieties (these really do taste very different and are worth exploring the different kinds)
Chicken of the Woods (it’s a mushroom that has the texture of chicken tenders)
All of the weird heirloom tomatoes (always buy the weird tomatoes)
Strange peaches and plums and cherries
Unique zucchinis
Mysterious cucumbers
Strange but delicious chicories
Fall
Heirloom squash!
Heirloom apples!
Heirloom pears!
Brussels sprouts attached to the stem like some alien creature!
Fun kinds of cabbage!
Basically anything you can imagine will be availabe until Ugly Vegetable Winter comes for us all

Farmers/Producers vs Resellers
There are two many vendor types at any farmer’s market, producers and resellers. At the Kitchener Market, they put up signage at each vendor station last year making it easy to know what kind of vendor it is.
Resellers are important in Canada since we only grow produce outdoors for half the year, but when I’m able to directly support a local farmer that’s the choice that I make. Some vendors are hybrids, bringing in rare products that are out of season here or outside the growing/foraging season.
If your market doesn’t have reseller/farmer signage, you can ask the vendors.
Get to know the vendors
If you go to the market regularly, you’ll start to build relationships with the vendors. This can be particularly great if they do specialty produce, like mushrooms or squash. Often they will reserve the rare items for regular customers, in a “you have to ask” category.
Cash and card
My biggest roadblock to the farmer’s market is cash. Many vendors take card now, but cash is guaranteed to work. You want to make sure you go to the bank before the market – here, ATM at the market charges $4 (plus your own bank fees). I’ve gotten to know which vendors take card, which helps, but most are still cash only.
If you’re driving to the market, make sure that you stop at the bank on the way there.
There is more than produce
At the Kitchener market you can get meat directly from regenerative farmers like Dave Rogers, great butchers like Forequarter, bread from Roux Bakehouse, eggs, cheese, baked goods, flowers, honey, and prepared food like empanadas and Beck’s Broth. You can do a full grocery shop all in one building!

When you get home
Prep your vegetables when you get home
I get it – you’re tired, your kids are hungry, there’s probably some kind of sports the kids need to get to, and you want to just shove everything into your fridge and carry on with your life. But I want you to consider how spending 10 or 20 minutes prepping your vegetables might change your life.
For me, much of the roadblock to mid-week cooking is the prep work. You have to empty the sink of the dishes you’re neglecting, find your colander, scrub the potatoes, then you get sucked into a vortex of washing the dishes and then suddenly its 6:30 and you haven’t even started dinner yet… so why not order a pizza?
Instead, imagine you know that you have clean, washed spinach and strawberries in the fridge. In 5 minutes you can have a salad. Maybe you have clean potatoes, green beans, chives, and herbs? In 20 minutes you have a warm potato salad – all you have to do is chop and boil the potatoes and green beans.
So put in the extra work to clean your produce – then you will actually use it.
I’m not here for pre-slicing your carrots and celery and sticking them in a jar of water (please don’t). What I’m advocating for is washing your produce all at once so it’s ready to cook with or eat directly from the fridge.
Wash your produce drawer so it’s sanitary: If you’ve been neglecting your produce drawer (who isn’t?), I would recommend that you wash it with soap and water before putting clean produce in it.
Organize by time, not type: I have two produce drawers, instead of organizing them by fruit/vegetable, I have one for last week’s produce and one for this week’s produce. This really helps me plan “fridge clean out meals” since I know what produce I have to work through each week.


Soak your greens and herbs in cold water, then roll them in a clean kitchen towel: Tender herbs and leafy greens can hold onto a lot of dirt. The fastest, best way to clean these is fill a very large bowl with cold water. Place as many greens as you can and swish them around. Depending on how dirty the greens are, you may need to change out the water.
Leave the greens to sit for 5 minutes so all the dirt falls to the bottom, then pull them out of the after. Place the greens on a large, clean kitchen towel, roll them up and place them in the fridge.
The slightly moist kitchen towel will help keep the greens firm longer in the fridge. The gentle drying (compared to a salad spinner) will prevent bruising, which will also keep them longer. This really helps extend the life of tender greens.
This technique of using a large bowl to soak off dirt works for basically any produce and uses a lot less water than running the tap. For example, leeks are notoriously difficult to clean. If you cut your leeks into rings, throw them in a bowl, swish, soak, and rinse they will come out clean ever time.
Scrub your root vegetables: For root vegetables – potatoes, beets, carrots, etc. you want to give them a quick scrub to get rid of any surface dirt. If the greens are attached you can either remove them and prep them like salad greens (above), or compost them.
If you scrub these well you can often eat the peels – which are really good for you!
Dry with a clean kitchen towel before throwing in the fridge.

Rinse your berries in vinegar water: Berries have so many nooks and crannies, they are covered in mold spores, and they have little homes for little insects. It’s a myth that washing them makes them go bad. Removing the mold spores and storing them properly will help them last longer.
Add 1 tbsp white vinegar to 4 cups of cold water (scale this up if you’re washing a lot of berries). Place all the berries in the bowl, swish them around, then drain the water. I’ve found it effective to put the berries into a colander and then put the colander back in the bowl and letting it drain for another minute or two. Moisture will waterlog berries and make them mushy, so place them in a bowl line with a clean, dry kitchen towel. Don’t add a lid or plastic wrap – that will trap moisture in.
If you’re worried the berries will go bad before you’re able to eat all of them, you can macerate them by adding 1 tbsp of sugar and the juice of a lemon, which will help them keep for up to 5 days in the fridge. The sugar will help draw out moisture, and the lemon juice increases acidity. Both coat the berries in a glaze that slow down bacteria and mold growth.
Rinse your fruit: Stone fruit (cherries, peaches, etc), pomes (apples, pears, etc), citrus (lemons, oranges, etc.) can all be rinsed under cool water and stored in the fridge – ready to eat! Imagine the snacking possibilities when you can grab a bowl of delicious cherries right from the fridge at midnight.
Generally I throw everything in a large bowl of cold water instead of running it under the tap. It’s easier to make sure you’ve washed the full surface.
Dry with a clean kitchen towel before throwing in the fridge.
Eat the whole vegetable: For many vegetables, you can eat more than what you think you can. I call these vers vegetables because they are both tops and bottoms:
Carrot tops can be turned into pesto or used to replace parsley anywhere you would use parsley
Beet tops can be used anywhere you would use spinach or Swiss chard
Prickly tops, like radishes and turnips, can be turned into pesto
Celery root can be turned into purée, roasted like potatoes, or turned into a grain-free risotto
Brush mushrooms and store them in a paper bag in the fridge: Mushrooms can be fickle to store. On the counter, they will dry out within 2–3 days. Your best bet for mushrooms is to clean them immediately then store them in a paper bag in the fridge (not in the produce drawer, which has too much moisture).
To clean mushrooms, I use a pastry brush to brush off any surface debris. The debris will either be wood chips for mushrooms grown indoors (like button, shiitake, oyster, etc.), or actual dirt from foraged mushrooms (like morels, chanterelles, or chicken of the woods). Most mushrooms are grown indoors, but if you’re unsure ask the vendor. It’s important to clean mushrooms immediately, once they start drying they will begin to fall apart.
I don’t believe in washing mushrooms in water, especially foraged mushrooms. They will become very soggy, fall apart, and become difficult to cook with.
If you want to dry out your mushrooms to use for later, brush them clean and lay them out on a clean cloth to dry.

“What do I do with all this…”
If you plan to buy in bulk, think about the ways you’re going to use or preserve food.
Here’s a few things to think about:
If you buy a whole flat of tomatoes, you can make your own tomato paste, confit tomatoes, or can tomato sauce.
If you don’t feel comfortable canning, your freezer is your best friend!
If you buy a whole flat of peaches (or other stone fruit), you can make a bunch of peach cobblers to keep in the freezer – ready to bake in the dead of winter to remind you there is still joy in the world!
If you buy a whole flat of strawberries you can make and can jam, make freezer jam, or freezable desserts like my strawberry latte tiramisu. Today I dehydrated slices of strawberries in the oven at 150°F for 6 hours (on parchment!).
If you have too many herbs you can make infused oils and vinegars, or wash them and dry them out on a clean kitchen towel (air drying over 3–5 days).
You can make your own smoothie kits: stock up on kale, spinach, berries, and apples. Wash and dry the produce (and slice the apples), then portion them out into single-serve smoothies. You can go right from freezer to blender.
Use the index in your favourite cookbooks, or search in apps like NYT Cooking
If you didn’t go to the market with a meal plan and a checklist, or the weird local produce caught your eye, it can be intimidating to figure out how to use all this new produce, and how it all might work together.
My favourite tactic here is to grab my favourite cookbooks from reliable recipe writers, flip to the index, and work backwards from each vegetable. It’s helped me discover new recipes I now love that I otherwise wouldn’t have made.
There are many apps now where you can input what ingredients you have and they will find you online recipes that work.
Most often I reach for Six Seasons by Joshua McFadden and basically any book by Nigel Slater (I am partial to Tender and the Greenfeast books). You can see all my favourite cookbooks here.
Become comfortable with substitutions by learning food categories
In my video content, I try to always highlight where substitutions can happen in a recipe. Recipes are not rules of law, they are ideas that someone wrote down because a certain combination of things worked once.
You can generally swap things from similar categories – any tender herb can take another’s place, like mint for parsley. Woody herbs, like thyme for rosemary. Wilting greens, like spinach can be swapped with beet greens, kale, or Swiss chard. Sure, the flavour will change – but that’s part of the fun.
Recipes are ideas, not rules. Use what you have!
Recipes for this week at the market
I have so many recipes this week! I am having fun in the kitchen! I am feeling like myself again for the first time in a long time!
And I mean, LOOK AT THESE PHOTOS I TOOK!
There is a printable PDF with all these recipes at the end of the email for paid subscribers.

Radishes with butter and salt
My friend Janice’s sister Michelle messaged me on Instagram when I posted about the Lucky Bug radishes. She asked if I had ever tried a French snack – radishes with butter and salt. I asked her how to make them… or if the recipe had a name… and then I realized…
It is radishes.
With butter.
And salt.
I made them three days in a row and then I ran out of radishes. I would have made them again but I forgot to buy more radishes today. I know this recipe seems silly and weird, but the creaminess of the butter works amazingly well with the spicy bite of raw radish.
Ingredients
Radishes
Butter, very soft at room temperature (use the best butter you can afford – St. Brigid’s Creamery being my preference)
Flakey salt
Method
Cut your radishes in half.
Add butter to your radishes.
Top with flakey salt.
(I promise you this is not a joke and that is the complete recipe).
Chive butter
You can make a compound butter – which is fancy for butter with stuff in it – from basically anything. Add orange zest and cinnamon. Add savoury and salt. Add lavender and lemon!
My favourite compound butter is made with chives. You can simply chop chives and mush them into room temperature butter, but it will be chives in butter. To get this vidid green colour you need to an immersion blender or food processor.
Ingredients
25 grams chives (1 bunch)
115 grams (1 stick) unsalted butter, very soft
Method
Food processor: Add the butter and chives to a food processor. Run the processor until vivid green. Transfer to a bowl and cover.
Chop and spoon: Cut the chives with scissors into tiny pieces. Add to a medium bowl along with the butter. Smush until well combined.
Uses and storage: Store in the fridge for a week. Serve on toast with flakey salt. Use to make a quick weeknight pasta sauce with parmesan cheese. Use to cook a steak or a chicken.

Cheddar and chive scones
Marci’s recipe for scones is incredible. I am addicted to it. It’s very versatile to swap to different flavours – I made them this week with sour cherries and orange zest. But Marci’s original flavour is the best flavour.
Ingredients
300g | 2-1/2 cups all purpose flour
34g | 2 tbsp granulated sugar
21g | 1-1/2 tbsp baking powder
3g | 1 tsp salt
160g | 3/4 cup cold butter
100g | 1 cup shredded cheese
28g | 1/4 cup chives, chopped finely or cut with scissors
8oz | 200ml | 3/4 cup cold milk
1 egg for egg wash
Method
Preheat oven to 400°F.
Mix flour, sugar, baking powder and salt in medium bowl.
Using a cheese grater, grate the butter into the bowl.
Break up the butter with your hands until it's fairly uniform with pea-sized butter pieces. Add the shredded cheese and chives and stir to coat all pieces with flour.
Pour milk into the dry ingredients, reserving 1–2 tbsp. Use a fork to gently to combine, then knead gently so the large pieces clump together.
Remove the clumped pieces from the bowl, setting them on the counter. Hydrate the dry mixture at the bottom of the bowl with reserved milk.
Using your hands, pat dough into a square (the size doesn’t matter yet), divide into four equal pieces and stack all four pieces on top each other, this helps create flakey layers. Press down into a rectangle around 6x10”.
Cut the dough in half, so you have two 6x5” rectangles. Cut each in half again so you have 4 rectangles that are 3x5”. Cut those diagonally, into triangles. You should have 8 triangles. (Note: Marci prefers shaping into an 8” circle and cutting into 6–8 pieces, but I like the precise triangles. You do you.)
Place on a baking sheet. Whisk an egg and brush on top of each scone. Optionally, top with flakey salt.
Bake 20-25 mins until golden brown.
Make ahead
You can freeze the scone before baking, and bake directly from frozen. They will take around 25 minutes.
Changing the flavours
You can change the mix-ins for both sweet and savoury scones.
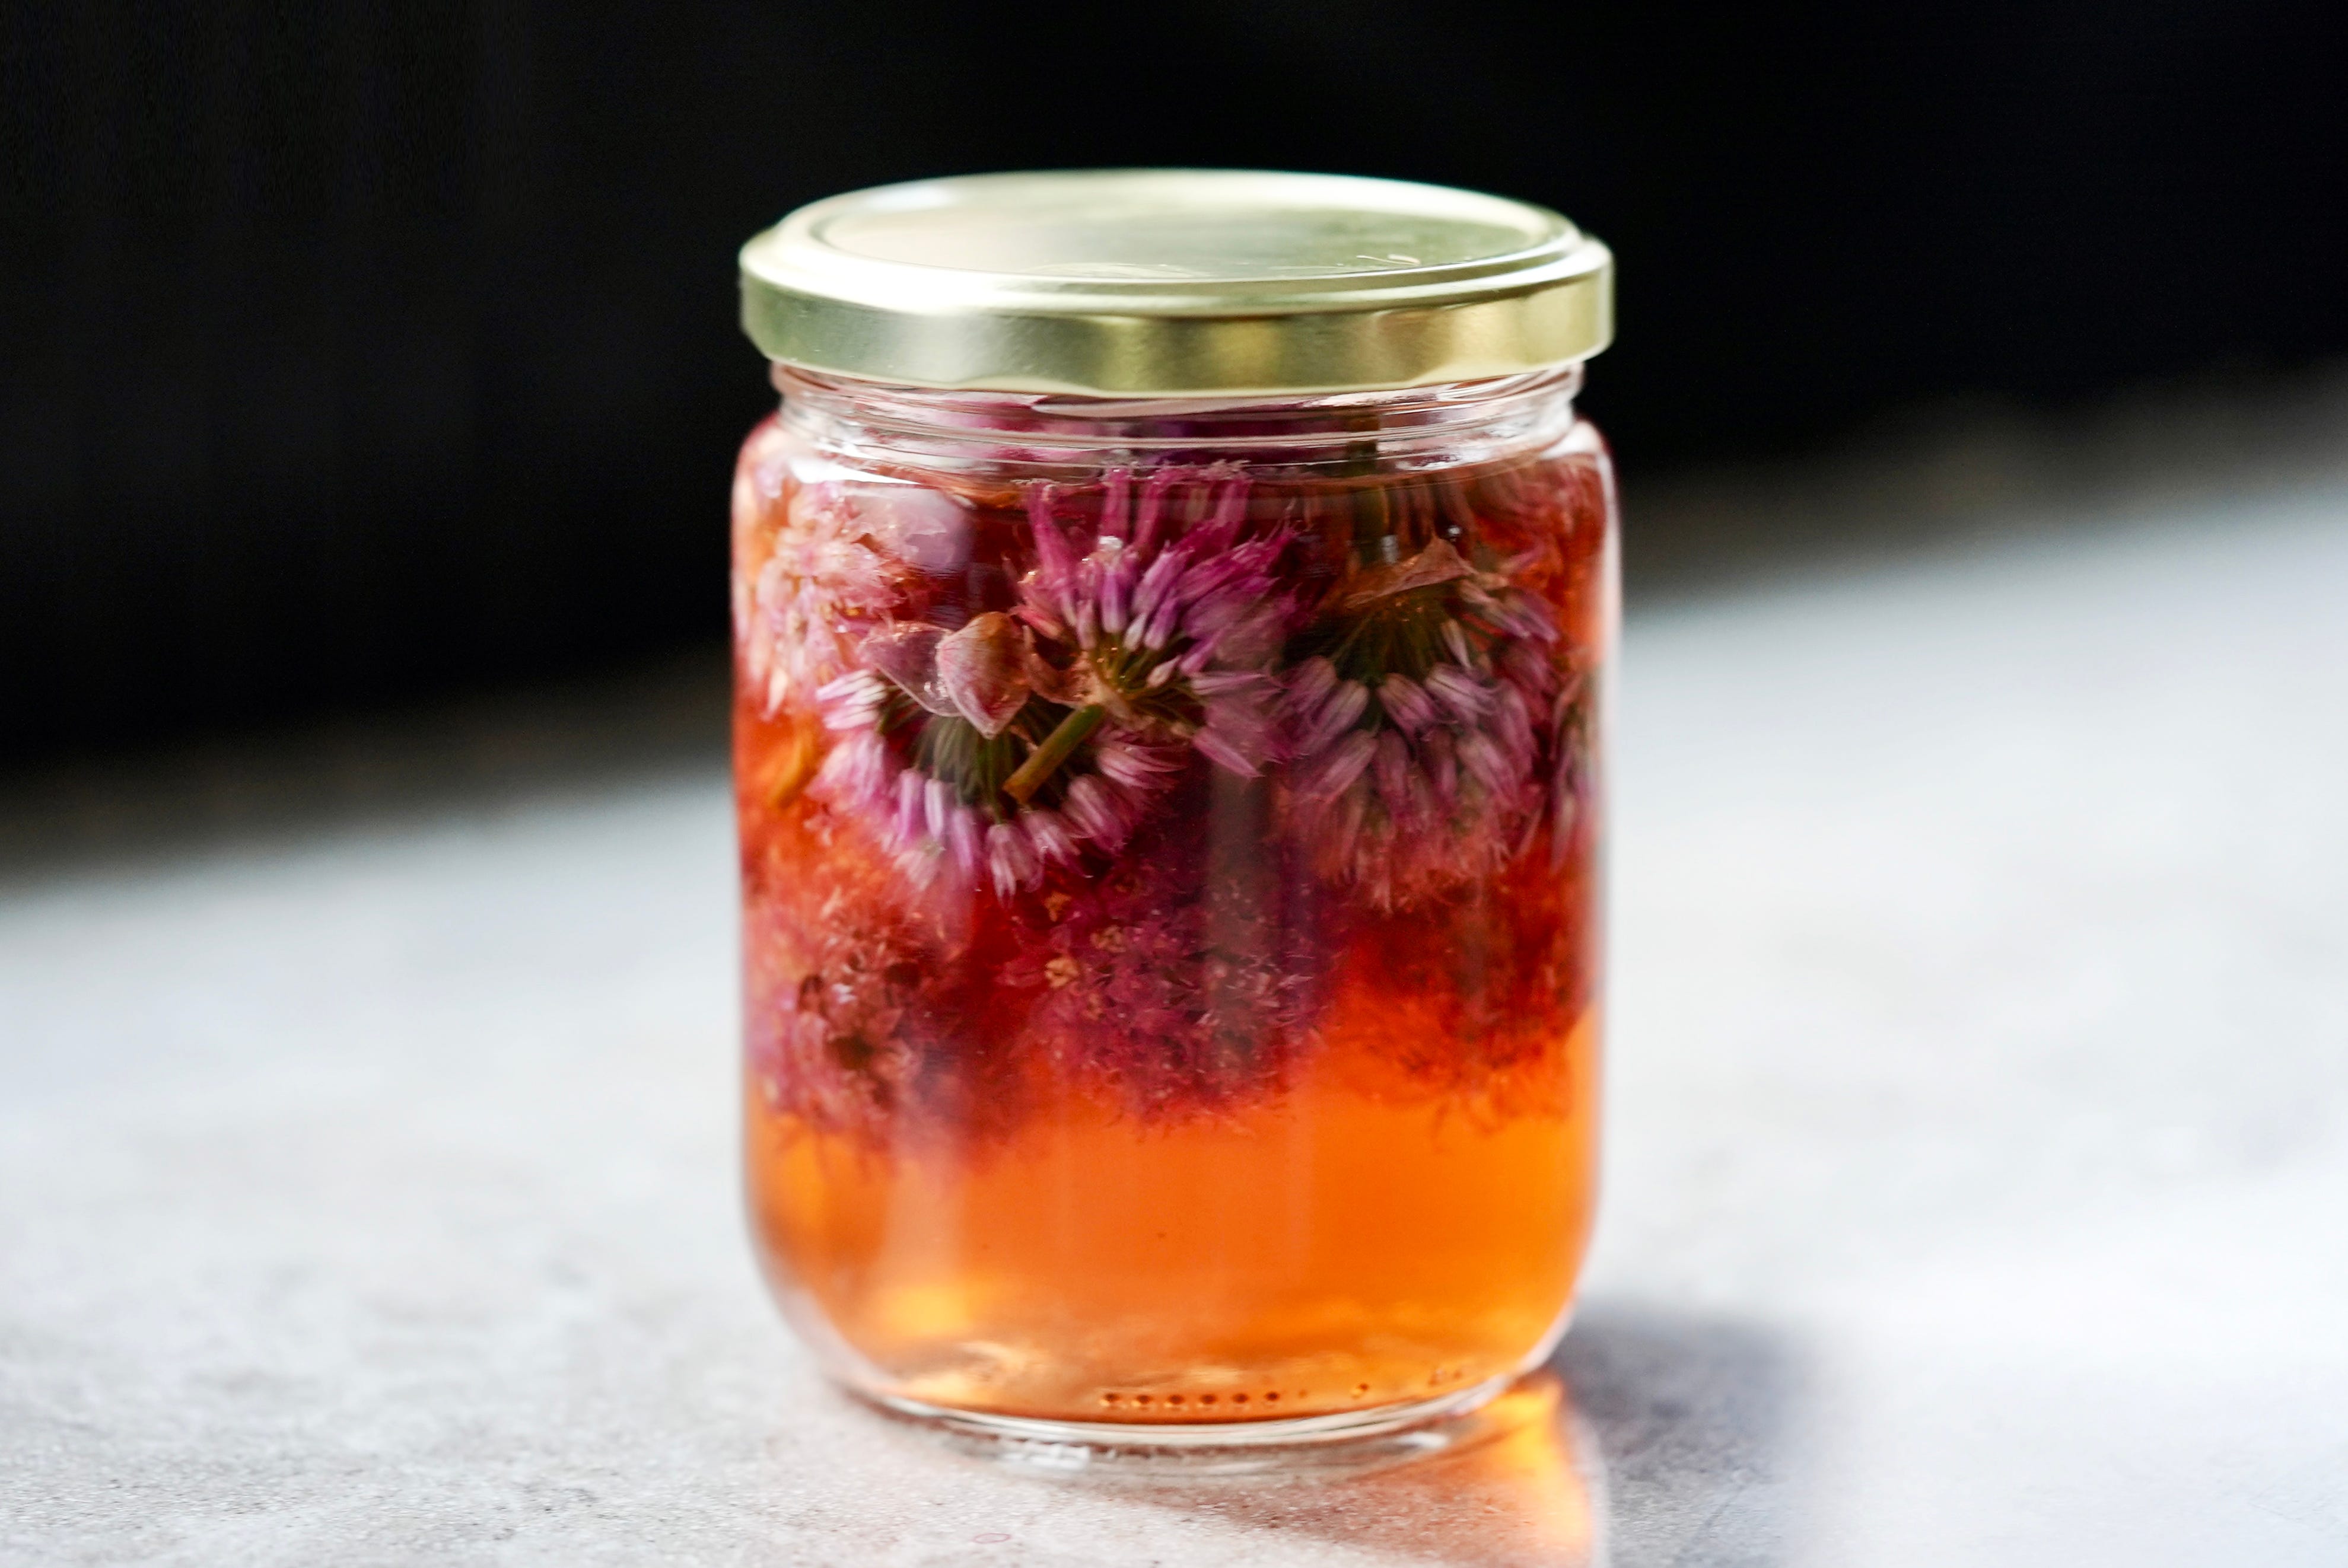
Chive blossom vinegar
Chive blossoms are completely edible. While they’re beautiful as a bouquet, they taste like very garlickly onions. They can be broken up and added to salads, used in chive butter, put into scones. But my favourite way to use them is to make chive flower vinegar, which keeps for… forever? And it makes a very delicious salad dressing or finishing flavour for soup.
Ingredients
1 bunch of chive flowers, enough to fill a small jar
White wine vinegar (or any vinegar you like to use in salad dressing, really)
A small jar
Method
Rinse the blossoms: Pluck the chive blossoms from the chives. I leave them whole but its okay if they break. Soak the chive blossoms in water so any dirt or bugs are released. Drain.
Cover with vinegar: Place all the chive blossoms into a jar then fill with vinegar until covered.
Wait: Leave to sit at room temperature for at least 2 weeks until it smells like chive vinegar.
Alternative: If you are in a rush, you can bring the vinegar up to a boil then pour it over the chive blossoms. This will extract the flavour more quickly, so you can use it as soon as it cools down. However, I find the slower method to give a much more nuanced flavour (and its easier).
Use: Use it anywhere you would use vinegar, such as finishing a dish. It makes an amazing salad dressing component.
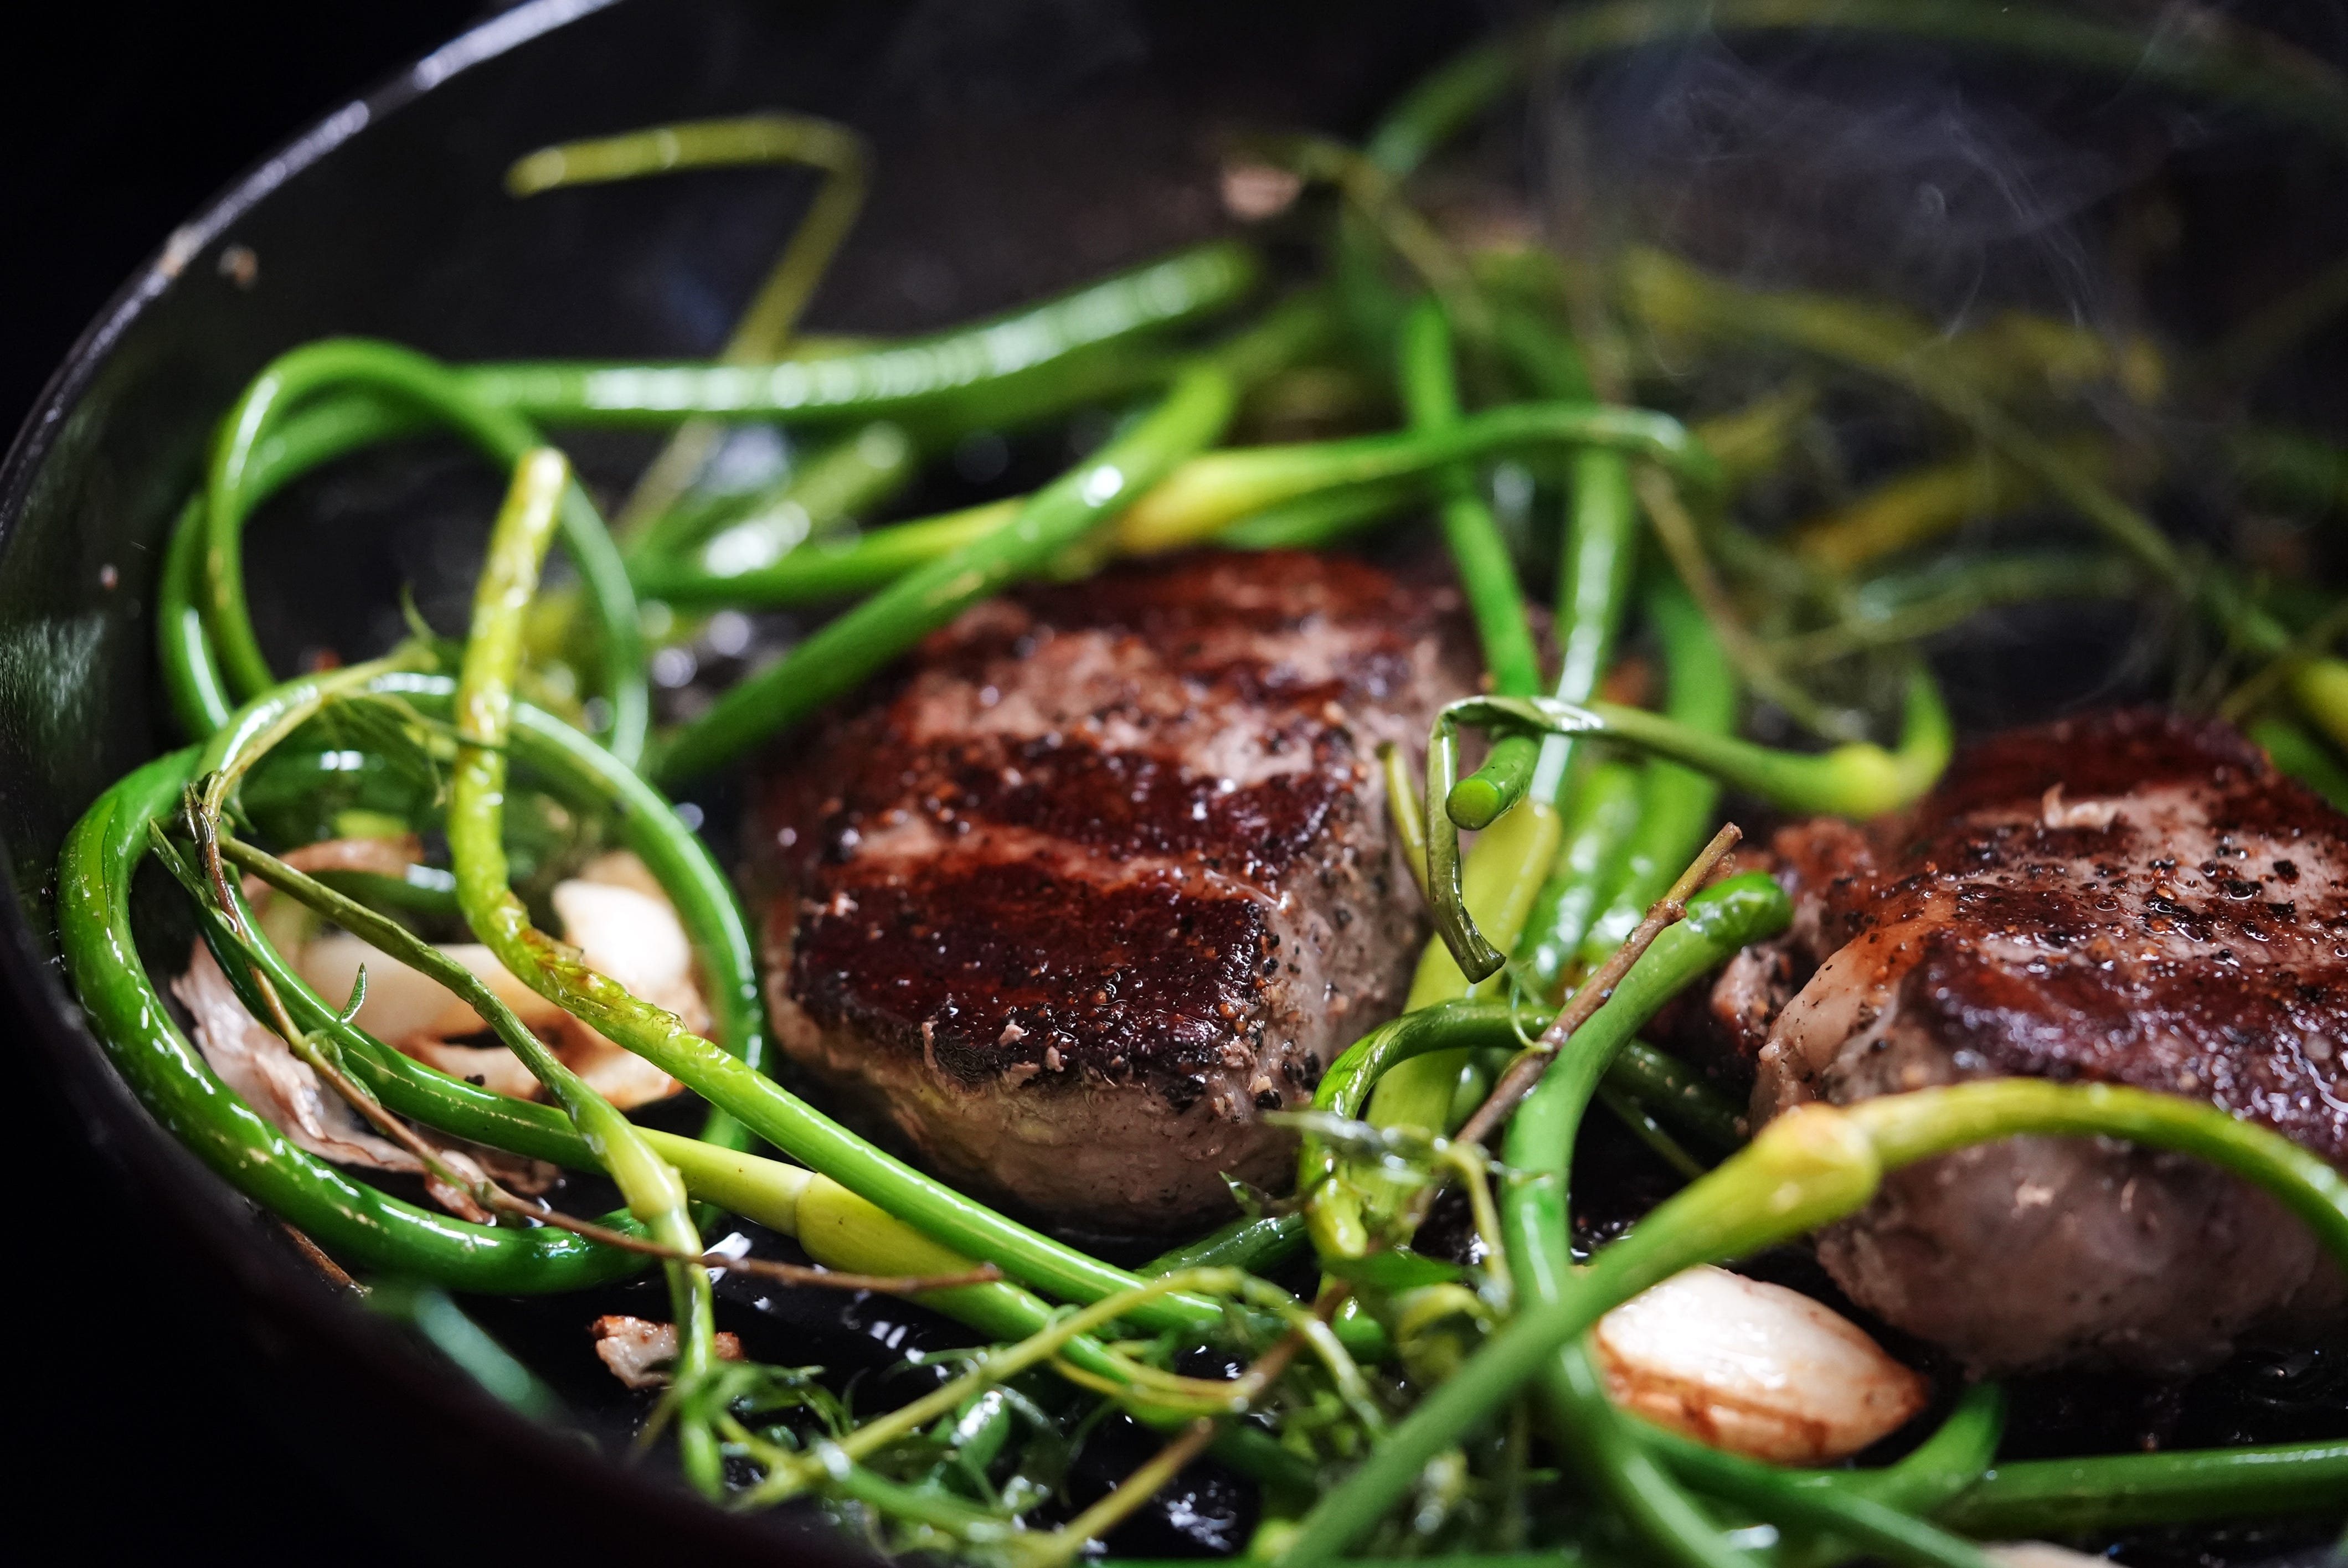
Garlic scapes and steak for two
Some garlic varieties grow seeds! Garlic scapes are the flowering stems of the garlic plant. If allowed to mature, they create seed pods – which uses energy that otherwise could go into growing bigger garlic bulbs. Because of this, scapes are usually trimmed off in June and July, so the garlic bulbs get bigger.
When raw, garlic scapes can be tough and stringy. When cooked, they become quite creamy inside. Scapes taste best when they are cooked on high heat. They can take a lot of char. They take around 7–10 minutes to soften. My favourite way to cook them is with a steak, but you can make them in a pan with olive oil as well.
Ingredients
2 tenderloin steaks, ideally from a regenerative farm like Rogers Ranch
2 tbsp grapeseed oil (it has a high smoke point, but olive oil will do)
2 tbsp butter
10 garlic scapes (you can cut them into 4–6” pieces but I don’t)
4 garlic cloves
4–5 sprigs of savoury (or thyme)
Salt
Pepper
Method
Salt the steak: A few hours before you plan to cook, coat the steaks in salt and pepper. Place on a wire rack on a baking sheet and put in the fridge for at least 30 minutes, up to overnight. This helps season the meat all the way through and dry out the surface for a crispy crust.
Heat the pan and turn on your ventilation: Use a heavy cast iron or carbon steel pan. Set on high heat. Turn on your ventilation or open your windows. Add the grapeseed oil and heat until it is shimmering and very hot.
Cook the steaks on one side: Add the steaks. I target medium rare by setting a timer for 4 minutes.
Flip, add everything else, and baste: After 4 minutes, flip the steaks. Set a timer for 4 minutes. Add the butter, which will melt very fast. Add the garlic, savoury, and garlic scapes. You’ll have to tuck the scapes in around. Let the garlic and savoury cook for 30 seconds, then use a spoon to move it onto the steaks. Tilt the pan and spoon the garlic onto the top of the steaks, basting them with the flavourful oil.
Remove the steaks and cook the scapes: When your timer goes off, remove the steaks to a plate to rest (resting helps the proteins settle down, so they will hold onto more juices, yielding a more tender and moist steak). Rest for 10 minutes. Reduce the heat to medium and continue cooking the garlic scapes until tender and beginning to char on the outside.
Add a splash of chive vinegar (or sherry vinegar, or lemon juice) to the scapes before serving.


Fried squash blossoms stuffed with taleggio
You can find squash blossoms most of June through October because squash plants never stop trying to make more squash. Like garlic scapes, the blossoms are removed so the plant focuses its energy on making bigger squash.
Ingredients
4 squash blossoms
4 pieces of taleggio cheese (or 4 tbsp ricotta, or cream cheese)
1/2 cup all purpose flour
1 egg, beaten
1/2 cup panko (or breadcrumbs, or flour, or cornflakes)
Method
Clean the squash blossoms: Soak the squash blossoms in a bowl of cool water, this will help remove any dirt and bugs. Remove them to a clean kitchen towel to dry.
You may need to cut the blossoms open. My preferred way is to use a paring knife or scissors to cut only one side. This will reveal the stamen – which is the long stem inside – it’s covered in pollen which is very bitter. You should cut or twist the stamen out to remove it.
Prepare your batter station: Get 3 shallow bowls or small plates.
On one, add the flour, salt, and pepper.
On the second, add a beaten egg.
On the third, add flour (or use panko, or cornflakes).
Pre-heat your oil: Fill a 3.5qt pan or a wok with neutral oil, such as grapeseed oil, and set on medium heat. If you have a digital thermometer, you want to heat it to 375°F.
Set up a wire rack on a plate.
Stuff with 1tbsp of whatever you want: This is a recipe, so I will tell you to put 1 piece of taleggio cheese inside – but you can put cream cheese, ricotta, chopped walnuts, anything you want inside.
If the blossom is cut, overlap the edges to keep it closed as you batter it.
Batter and fry: Place the stuffed blossom in the first place and lightly coat it in flour. Shake any excess flour off.
Move to the egg and coat it.
Move to the panko and coat it.
Add to your wok and fry for 2 minutes per side.
Remove to a wire rack, allowing any excess oil to drip off.
Serve: Serve while still warm. Top with balsamic vinegar. Or add on top of a salad!
PDF recipes for paid subscribers
Paid subscribers get exclusive content, like beautiful printable PDF recipes.
Keep reading with a 7-day free trial
Subscribe to Probably Worth Sharing to keep reading this post and get 7 days of free access to the full post archives.