

Probably Worth Sharing is a reader supported publication, please consider a free or paid subscription to support my work and enable me to buy fancy beans.

I would like you to reconsider the humble bean. Beans are often seen as an also-ran: beans are a side dish, beans are a component of a meat dish, beans are something only hippies and vegans eat as a main course. Beans are the probably-fine-but-not-great alternative to what you actually want to eat.
And they make you fart.
But I am here with recipes for beans that are more delicious than their meat alternatives. I am here with science to take the farts out of beans. I’m going to show you how to care for beans the way beans care for our planet.
I’m not here to tell you to replace all of your meat consumption with beans, but I do believe if you try these recipes you will add beans to your rotation a few times a week because they are delicious.
I love beans and I want you to love them too
I have bean art. I have a bean sofa. I make a different kind of dried bean from Rancho Gordo every week. I have no relationship with Rancho Gordo, I just really like their heirloom beans. Shipping to Canada is expensive, so I only buy beans twice a year – 26 bags at a time (maximize that flat-rate shipping!). One bag of beans for each week of the year. (Canadian friends: use this link to view the beans they’re able to ship to Canada).
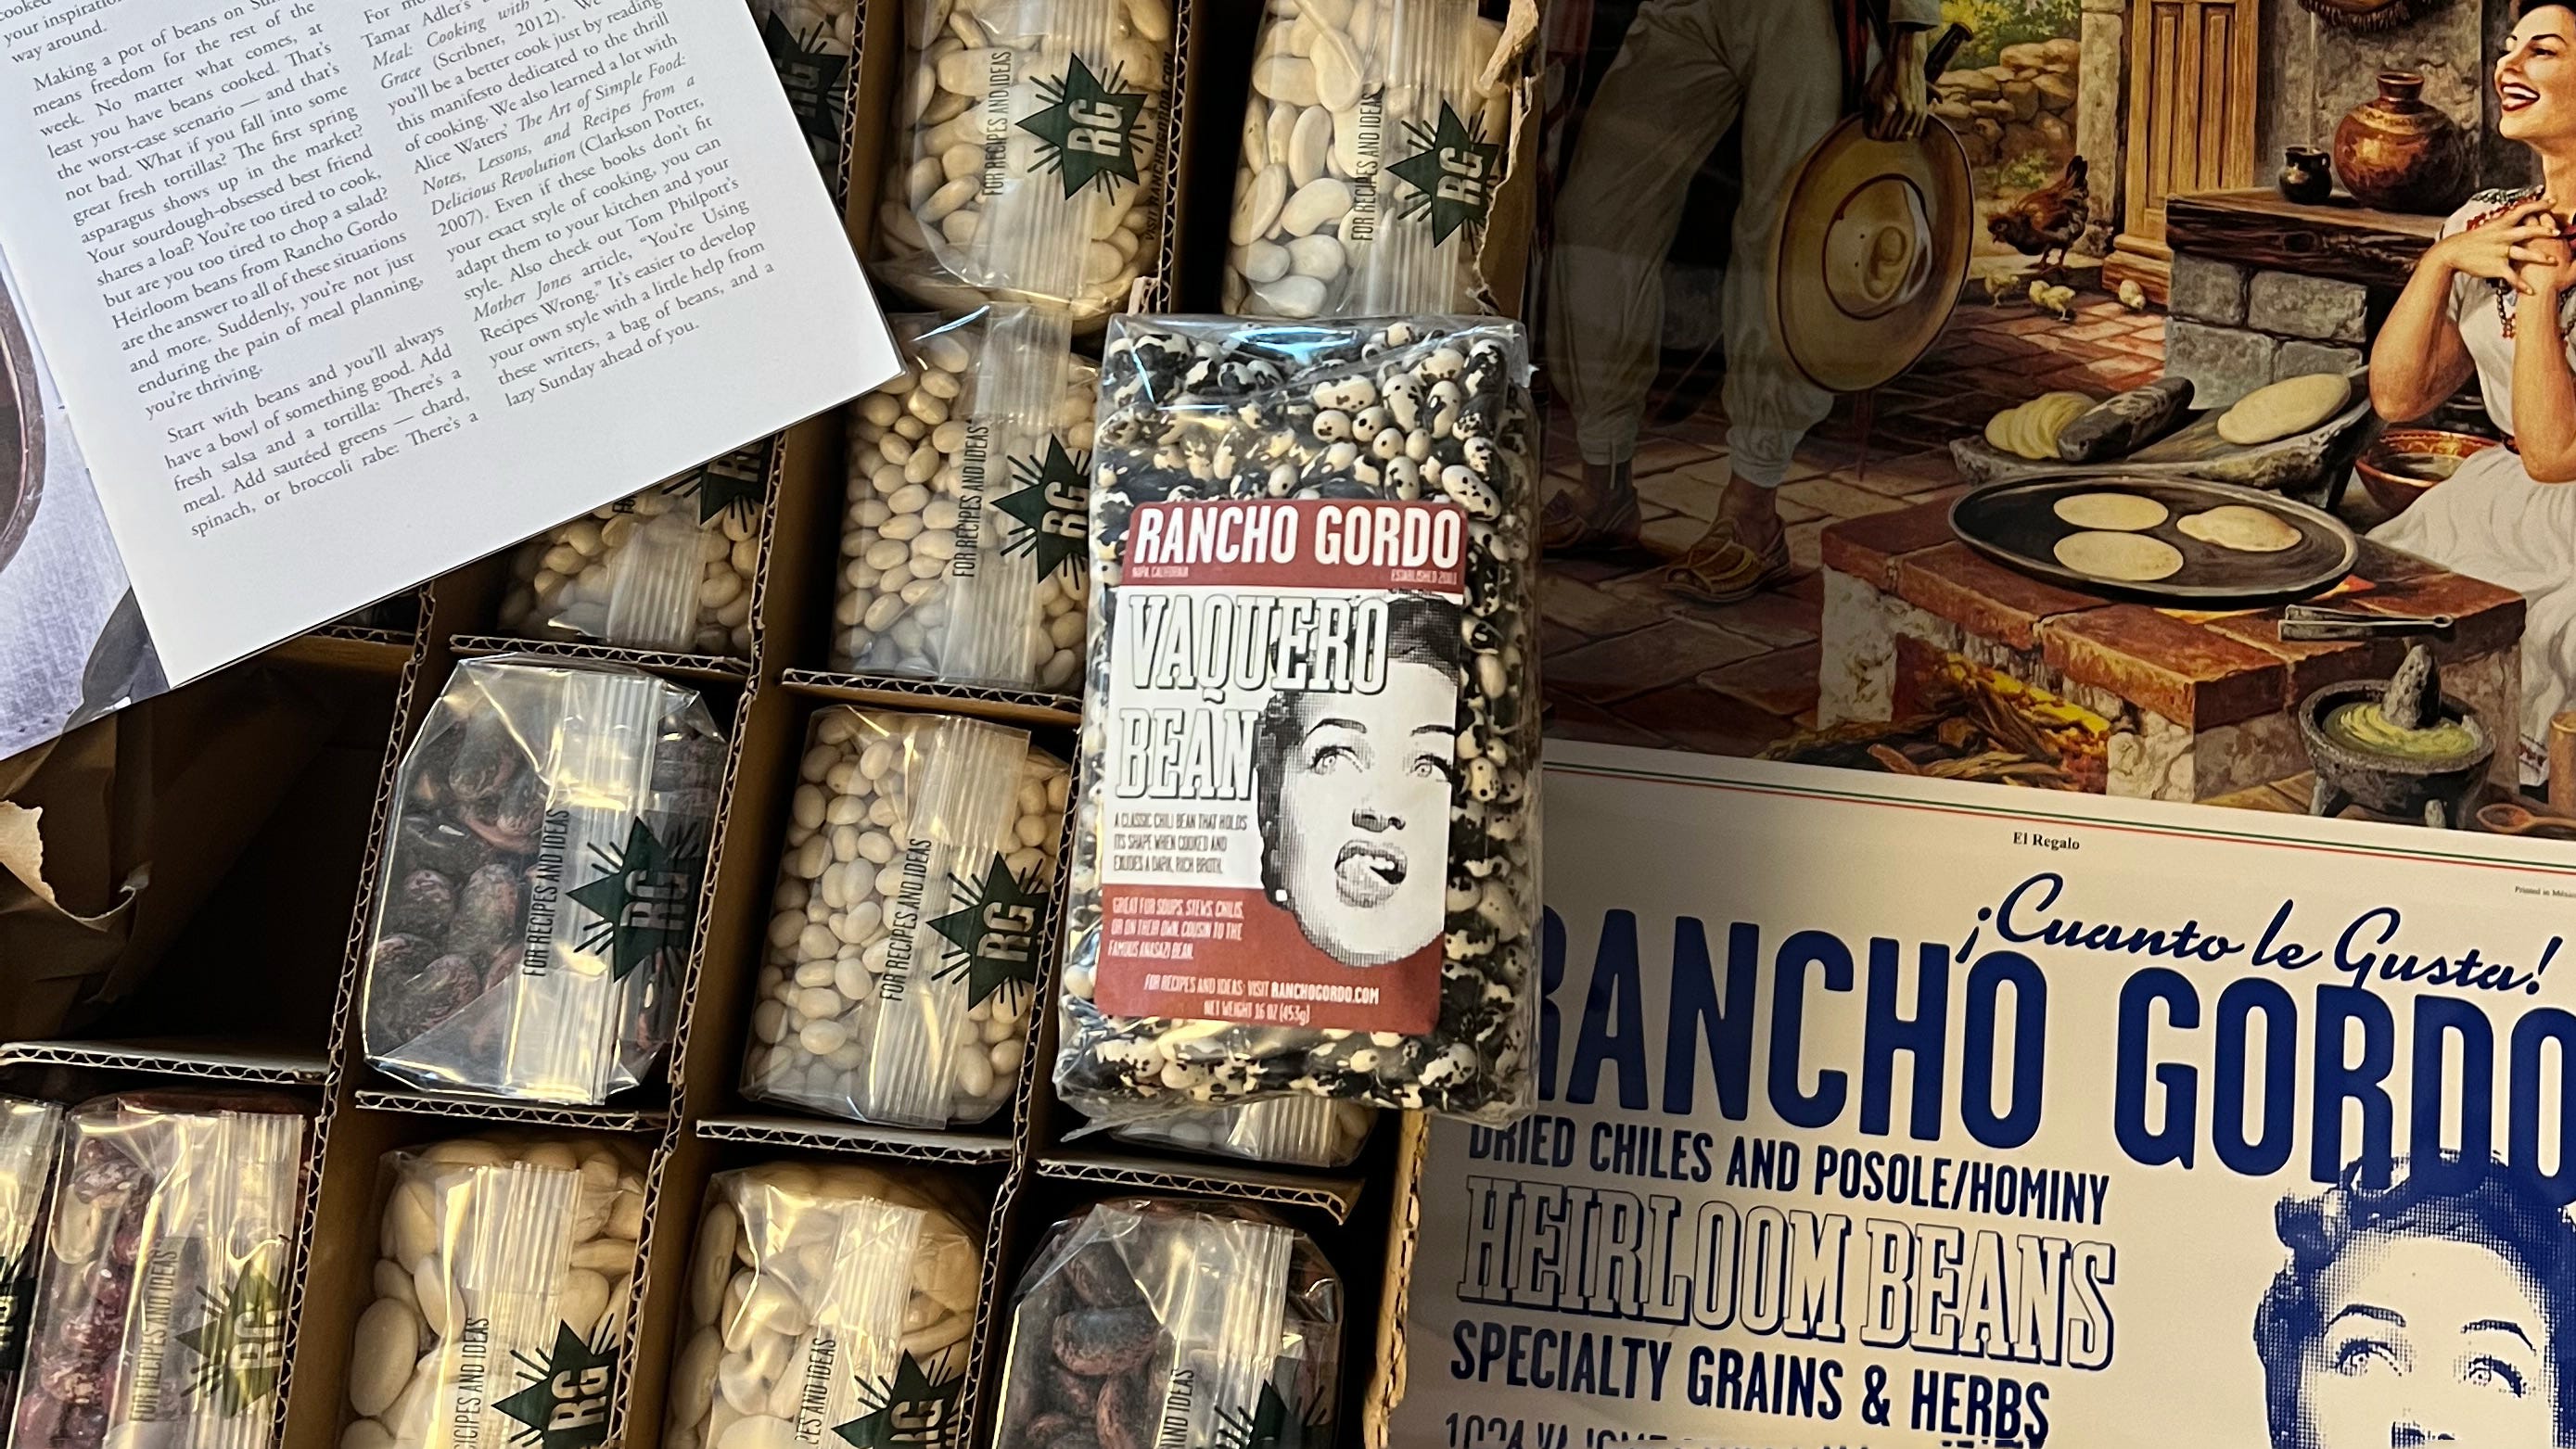
Trying new beans is fun for me, I value novelty. It’s important to me to support biodiversity in our food system, which is why heirloom varieties are great to buy. And while they seem expensive at $10 per 1lb bag after shipping, these fancy beans make affordable meals: each bag of beans makes 6–8 cups (3+ lbs!) of cooked beans. That’s only $1.60 per serving for a delicious and high protein meal if you buy the fancy beans.
If these prices scandalize you, you can buy great farm-traceable Canadian-grown beans from Flourist for $7/lb. Oak Manor sells organic, Canadian-grown beans for around $3.20/lb. You can, of course, buy non-organic beans grown elsewhere in the world for around $1/lb, but I would encourage you to buy locally grown, organic products if you can afford to.
One last sales pitch on price: a whole chicken only yields 45% of its weight in meat, so you would need to spend $15–25 on a 6.5lb chicken to get the same amount of food. Sure, you can use the chicken bones to make broth – but the beans make broth too!
We treat meat and plant proteins differently in our hearts, on our plates, and in our recipes. You might dry brine a whole chicken overnight in the fridge, roast it with aromatic vegetables, and serve it with a sauce made from the drippings. You might turn the meat into chicken pot pie filling and turn the bones into broth. You transform the chicken with care.
But with beans, most people open a can and throw them in a pot and hope for the best?
Stop and think about that for a minute: if someone told you they don’t like chicken, and their only experience was opening a can of chicken (yes, that exists), would you accept that they don’t like chicken?
You would not. You would describe a roast chicken. You would probably make them a roast chicken.
Brothy beans are the roast chicken of beans. Baked beans are the pulled pork of beans. Shakshuka doesn’t have (or need) a meat equivalent because it’s incomparably delicious. Home-made soy milk will change your feelings on soy, and making your own hummus will save you so much money (everybody loves hummus and it doesn’t need a sales pitch). All of these recipes are below and on my website.
You should add beans to your rotation because they are delicious. You can also eat beans because they are good for you, because beans help rebuild our soils and remove nitrogen from the atmosphere (300x more potent at heating the earth than CO2). You can eat beans because they are affordable.
But mostly you should eat beans because they are magic. I want you to believe in magic.
Objection handling
In my previous work, as the CEO of a tech startup, I had to wear both my sales and marketing hats. Product positioning and objection handling were tactics we needed. In most sales situations you aren’t selling against another product, but against the status quo – the change nothing option. It’s really hard to get people to change their habits, especially lifelong food habits.
Beans have a lot of objections. Let’s handle them.
How do I know what kind of bean to use in each recipe?
You can cook any dry bean like brothy beans and they will be delicious. Once cooked, you can decide how to use the beans. Beans are hard to categorize since their shape, size, and colour don’t really align to their flavour, density, or traditional use.
If you’re trying to swap a bean, look at how the beans are described:
Bean Density: Are they firm and hold their shape when cooked for a long time, or soft and cream, but fall apart if cooked too long?
Bean Taste: Are they mild or nutty?
Bean Size: Are they large or small?
You can usually get away with using any bean in any recipe, but a mild creamy bean will make for better baked beans because they absorb all the other flavours, while an earthy, nutty, dense bean will make better refried beans because they taste like beans. Follow the recipe recommendations, or swap with what you have and/or like.
They’re your beans.
When in doubt, make soup. Or stew. Or dip. Or baked beans, chili, pasta e fagioli, pasulj, feijoa, refried beans, bean salad, bean curry, daifuku, beans and rice, bean protein bowls, or simply put beans on toast. There are countless ways to make them.
Beans!!!
Bean myths!
Myth: Beans make you fart
This is true but preventable!
Beans are high in fibre, which your gut microbiome needs to be healthy. Studies show that the fibre in beans helps improve heart health, likely because it feeds your gut microbiome which then produces beneficial compounds. This fibre also keeps you regular, which helps you fit into your nice pants!
If you aren’t getting enough fibre in your diet, adjusting to more fibre can cause gas, but that’s going to happen with any high fibre food.
But fibre isn’t the cause of the vicious farts beans unleash on the world – it’s a sugar called raffinose. Raffinose can’t be digested by your body – humans don’t make the enzyme for it – so as it makes its way through your digestive system your microbiome feasts upon it and produces gas as a result. These are your own methane emissions!
There is a solution, an enzyme called alpha-d-galactosidase, which converts raffinose into glucose (simple sugar). By soaking dried beans with kombu, a type of seaweed which contains alpha-d-galactosidase, you’ll make beans more digestible. Since the raffinose converts into glucose, the beans also become sweeter – so they taste better!
If you do use kombu, you must remove it before cooking beans or it will become incredibly bitter once boiled. It’s the kind of bitterness you can’t remove.
Some brands of canned beans, like Eden Organic, include kombu in their canned beans. I also buy dried kombu Eden Organic.
Fun fact: Beano, the anti-gas pill that nuns take when they eat beans, has only one ingredient: the enzyme alpha-d-galactosidase. Save money, use seaweed!
Alpha D Galactosidase is also the name of an intergalactic traveler with toxic masculinity and a penchant for side eyes, which is how I remembered what it was called for this article.
Speaking of toxic traits…
Myth: Beans are toxic
This is both correct, but misleading. Once boiled for 10 minutes, beans have no appreciable toxins. Canned beans are already heat-treated as part of the canning process and are safe to eat right from the can.
All beans, but particularly red kidney beans, contain phytohaemagglutinin (PHA) which is a type of lectin (a lectin is a type of protein). PHA will cause nausea, vomiting, cramping, diarrhea, etc. if you eat uncooked dried beans. Since PHA is a protein, it denatures – breaks down – completely at boiling point. All dry beans should be cooked at boiling point for at least 10 minutes to ensure all of the PHA is broken down through to the centre of the bean.
Some guidelines also say to discard the bean soaking liquid since PHA is water soluble, but since PHA breaks down at boiling point, but as long as you boil your beans you don’t need to do this. The bean soaking liquid often includes a lot of beneficial flavours, nutrients, and proteins. I always keep mine. However, as red kidney beans contain 25x more PHA than other bean varieties you may want to do that for red kidney beans specifically.
Phytohaemagglutinin is also a character in my space opera about beans.
Myth: you can safely cook dry beans in slow cookers and Instant Pots
The FDA does not recommend using slow cookers for dried beans as they may not get hot enough to remove PHA from beans, particularly at the lower, slower temperatures. If you want to cook a bean recipe in a slow cooker, please use canned beans or boil your beans for 10 minutes before proceeding with the recipe.
You can cook beans right from dry in an Instant Pot, but you should cook them for at least 45 minutes at high pressure to ensure the PHA is completely eliminated. Since pressure cookers do not reach boiling point (the pressure helps water boil at a lower temperature) you need to cook them for 45 minutes. Many Instant Pot recipes are 20 minute meals, which is very appealing, but if they cause you to have cramps you may want to cook your beans longer.
Myth: You don’t have to soak beans / You have to soak beans
Soaking beans is optional, but it adds a lot of value if you remember to do it:
As mentioned, if you soak beans with kombu, the enzyme alpha-d-galactosidase will convert raffinose into glucose. This both makes the beans taste sweeter and reduces how much gas you’ll produce, meaning you can eat beans without becoming uncomfortable. You can’t boil kombu so you have to do it before you cook the beans.
Soaking beans at least 4 hours but ideally overnight, helps them slowly absorb water so they grow at a slow pace (they’ll triple in size!), which creates a better texture and prevents the beans from breaking apart.
Soaking beans cuts the cooking time (and energy costs) by more than half!
Soaking beans pulls much of the PHA out of beans, as it is water soluble. This means the PHA breaks down much faster. This is also why some recipes recommend discarding the soaking liquid, but as discussed above it’s not necessary.
You can soak your beans in salty water, which makes them taste better and cook faster!
Which gets to…
Myth: When you salt beans changes the texture
There are many myths around salting beans – adding salt too soon makes beans hard! Not salting until the end makes them bland! You should salt in stages! You should salt after cooking! Everyone disagrees, so researchers in Manitoba did the science.
Soaking beans in 2% salt water results in creamier, softer, tastier beans that cook 20% faster.
This makes sense as salt attracts water, and as salt is pulled into the centre of the beans it would pull even more water into the beans.
Science!
Myth: Beans never go bad
If your beans are hard after cooking for a long time, it is likely because you have questionably old beans, which are really only good for pie weights. Beans older than 3 years old will rarely get soft, no matter how long you cook them.
Another great benefit of buying from local or heirloom bean suppliers is that their beans are relatively fresh. I know it’s confusing, but you want fresh dry beans.
Myth: Beans aren’t a complete protein
There are nine essential amino acids the human body needs to function. When all of these are present at the same time in food, it’s referred to as a “complete protein.” Many people will say that beans are not a complete protein, which is factually correct but also misleading. Your body needs a balanced amount of all nine amino acids. These amino acids can come from a wide variety of foods throughout your regular diet, across your day or your week – they don’t have to be in the same bite.
Every bean is different, but most lack methionine and lower amounts of leucine and valine. So if you eat foods other than beans, like wheat, oats, spinach, nuts, and seeds, you are probably getting what your body needs.
Recipes
Enough of my phaseolus vulgaris jokes. Here are my go-to bean recipes.
Brothy Beans
Brothy beans is my go-to cooking method for making beans. I learned about it, like many people, in Carla Lalli Music’s video (where she learned about it from another chef). I’ve been making all of my beans this way for years now, here’s how I do it.
Ingredients
500g | 1lb dried beans
1 small piece of kombu
1 bay leaf
1 lemon, cut in half
1 onion or shallot, cut in half
1 head of garlic, cut in half across the equator
125ml | 1/2 cup olive oil
Salt and pepper to taste
Red wine vinegar or lemon juice to taste
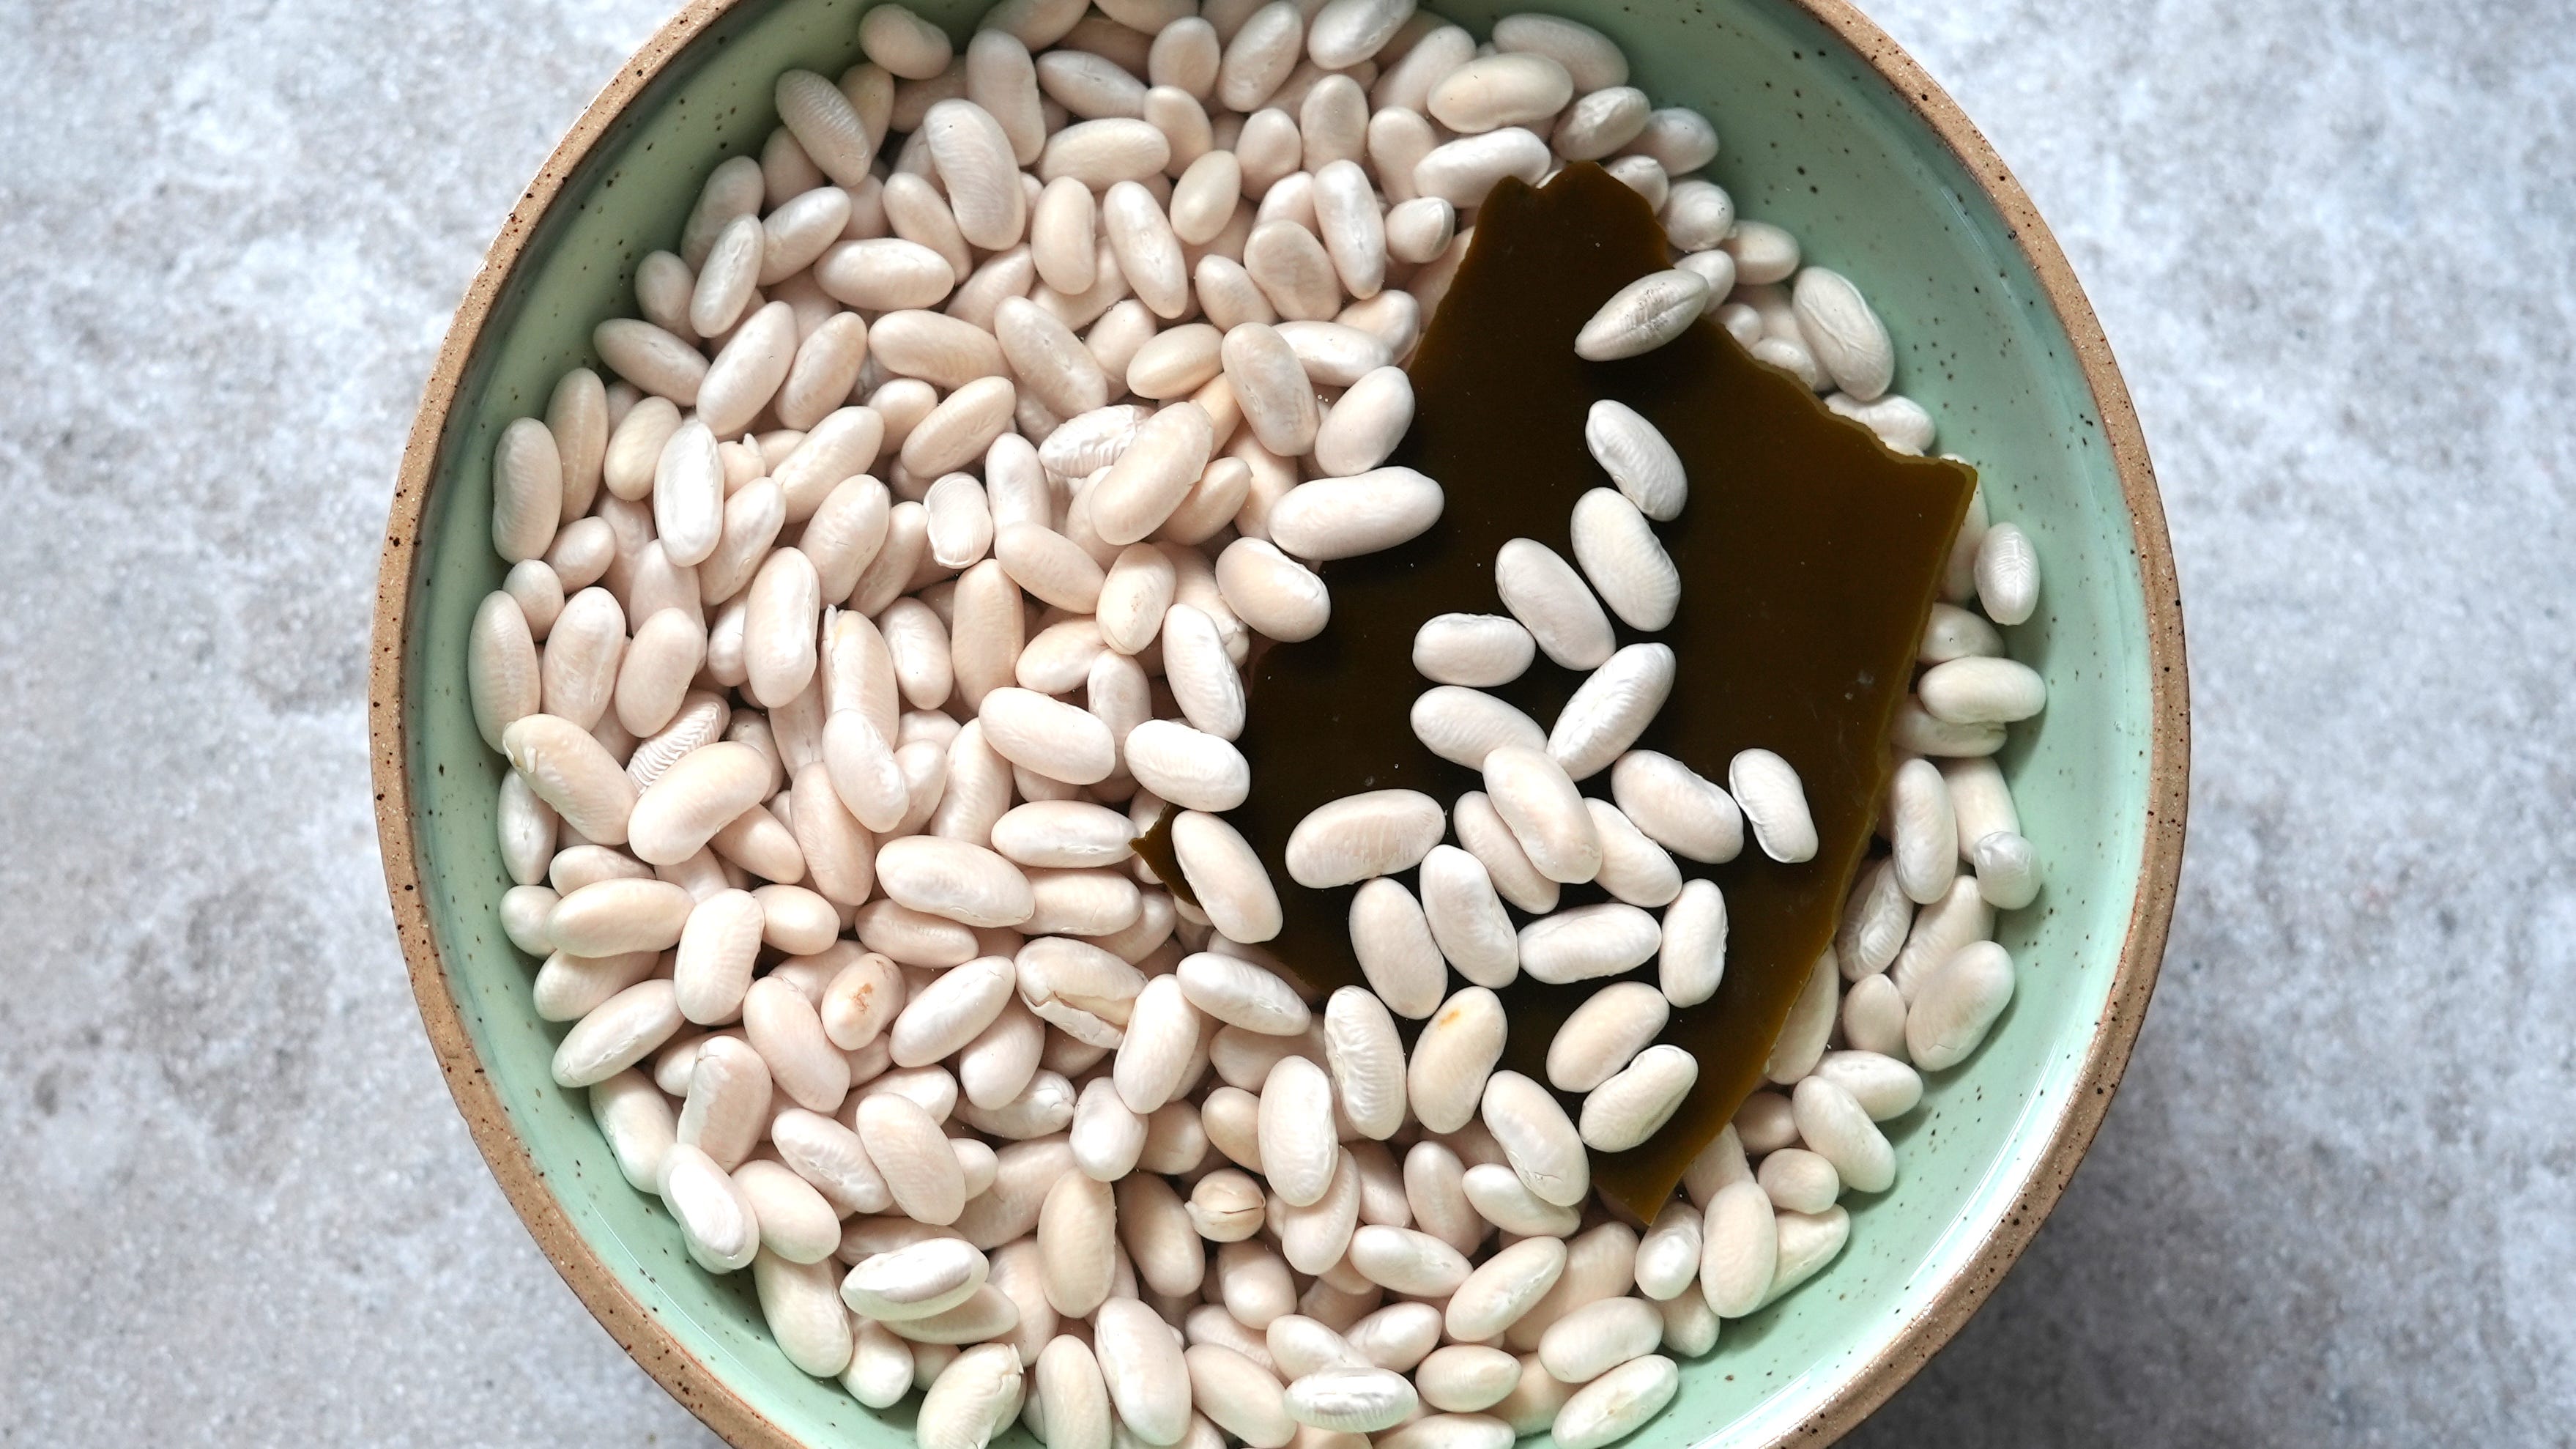
Soak your beans overnight
Rinse your beans and remove any stones if present. Place the beans in a large bowl, add a small piece of kombu, and fill with clean, cold water to cover the beans by at least 2”. Depending on how old your beans are they may need more or less soaking time, minimum of 4 hours but overnight is best. The beans will double in size so make sure your bowl is large enough.
Cooking
Remove the kombu – do not cook the kombu, it will become bitter.
Pour the beans and bean soaking liquid into a large pot. Add more water to cover by at least 2 inches.
I repeat: remove the kombu before cooking! It’s the kind of bitterness you can’t treat, like a relationship too far gone to salvage.
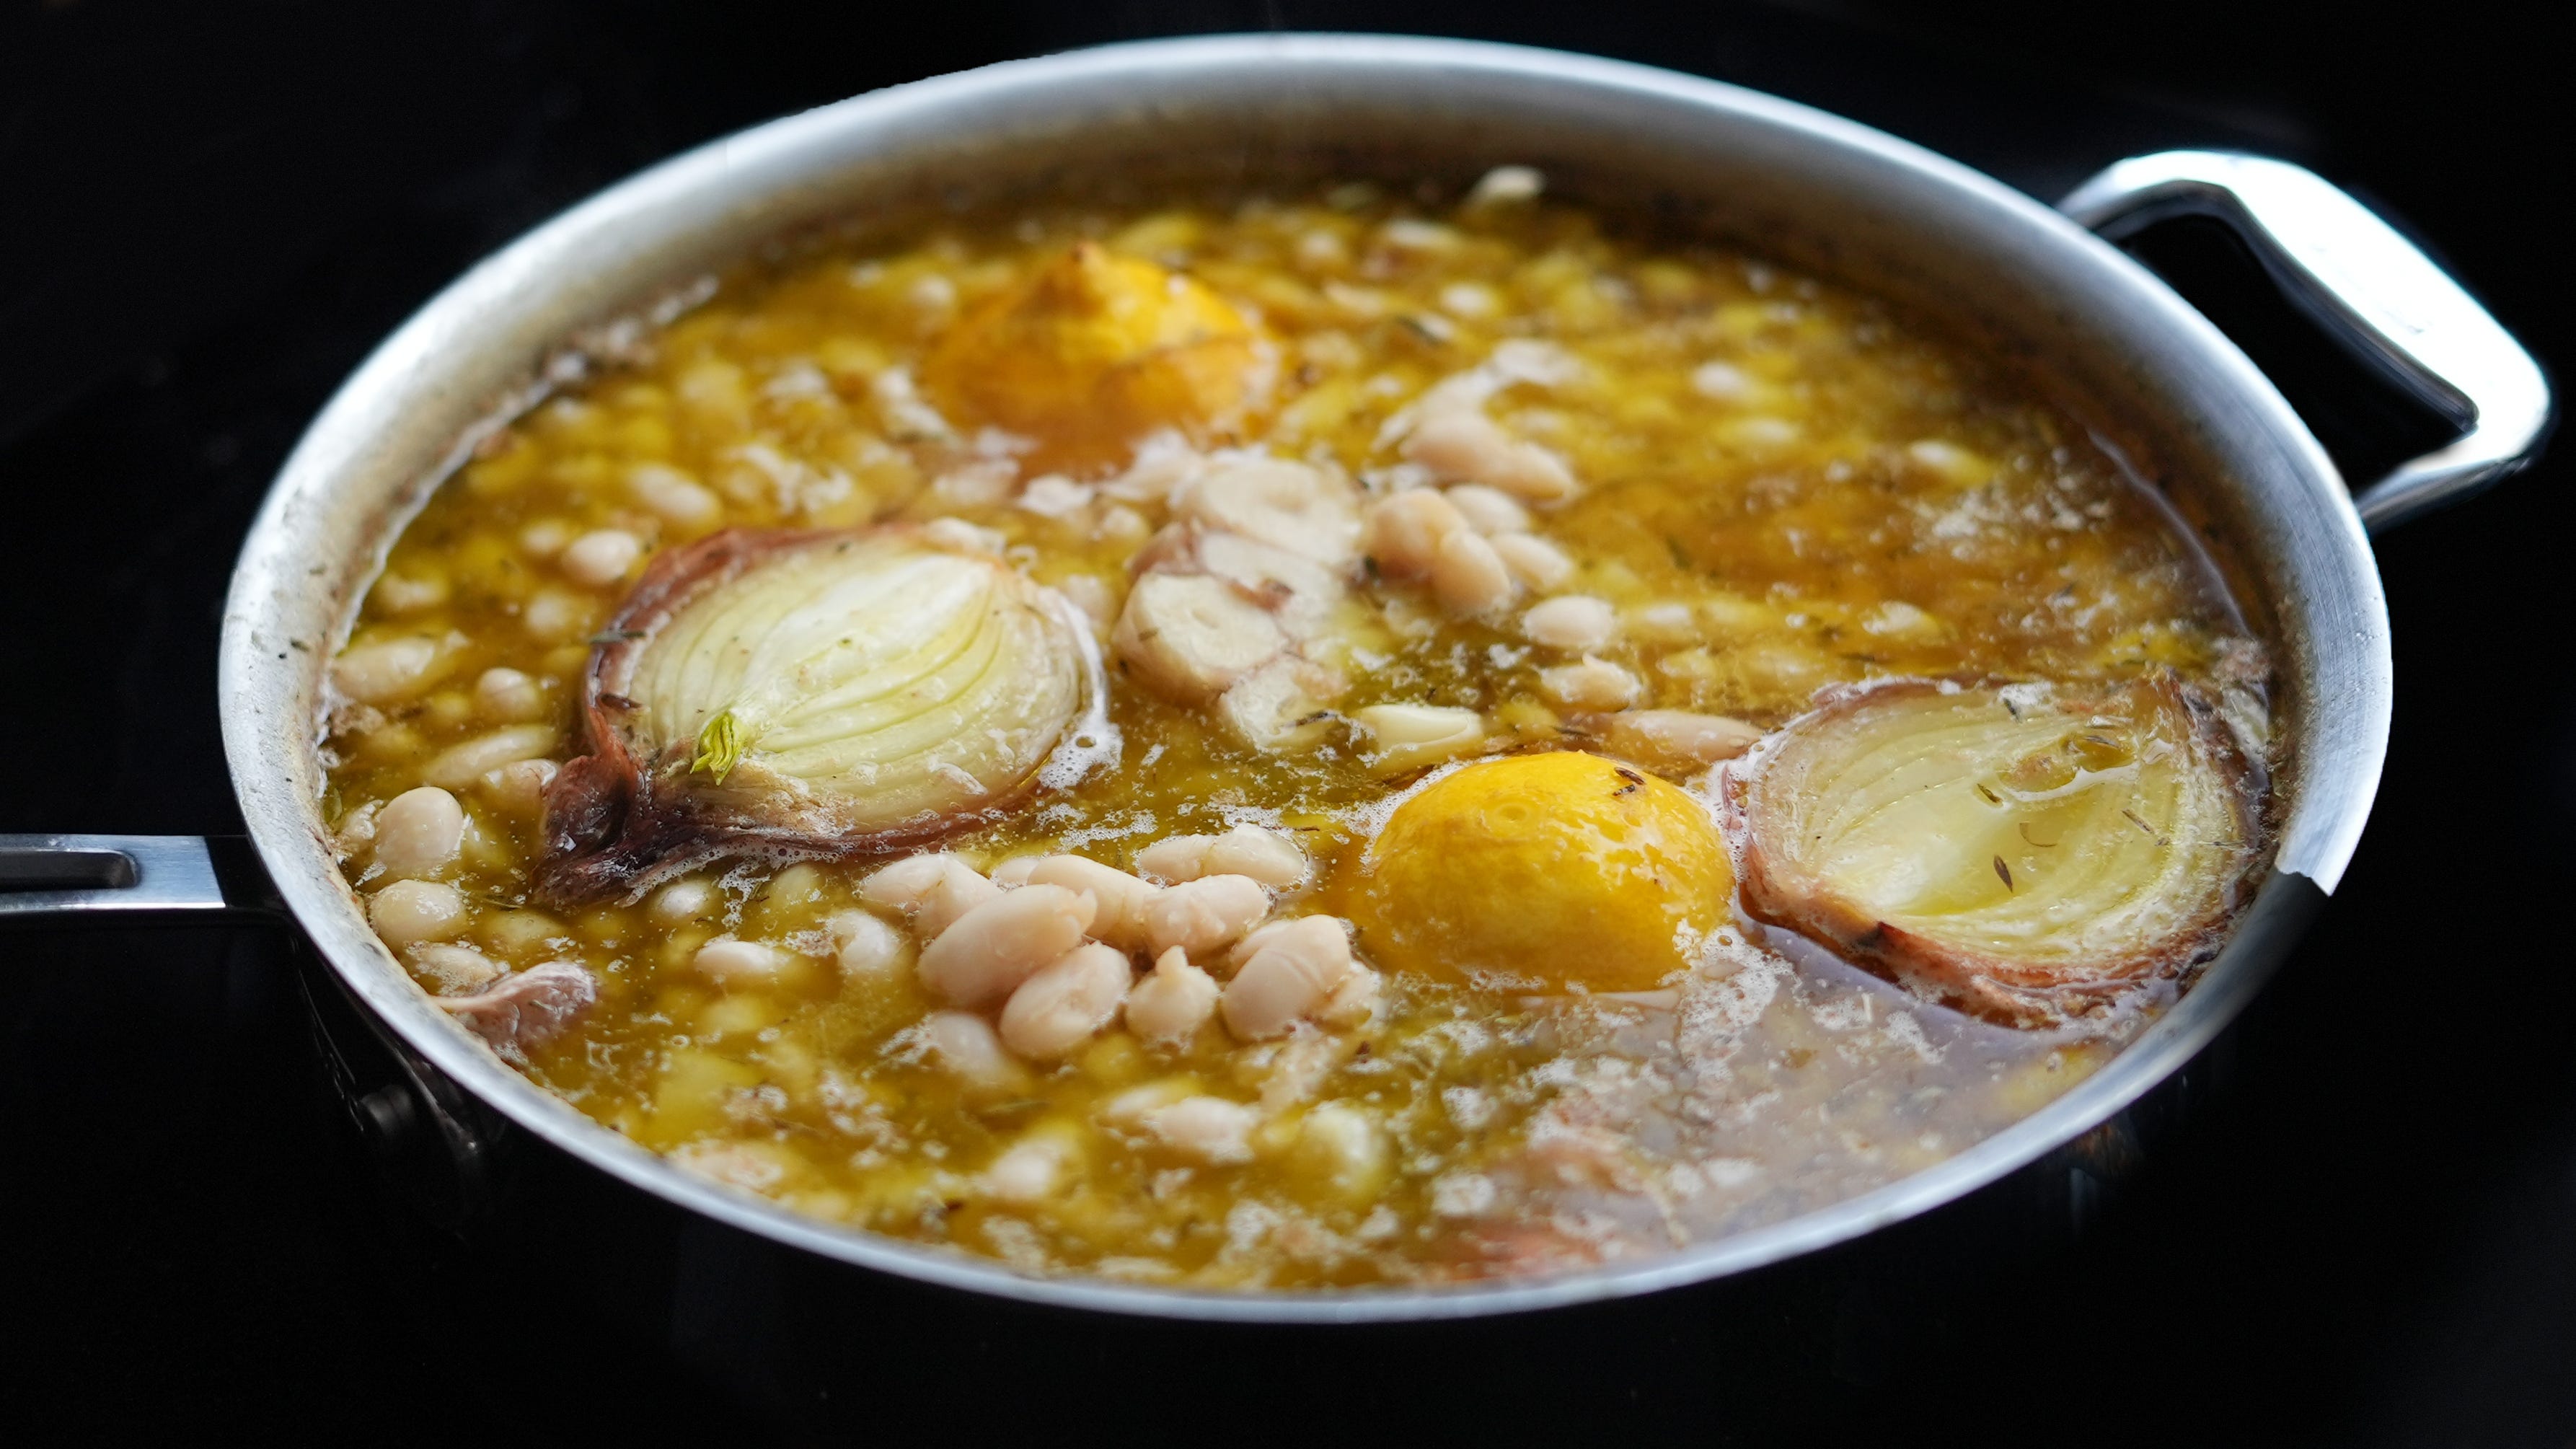
Bring to a boil.
This will trigger some proteins in the beans to foam, similar to boiling meat for stock. Skim off the foam and reduce to a simmer. Once the beans stops foaming, add the other ingredients. If you add ingredients like olive oil or herbs before all the foam is gone you’ll just be scraping them away.
Add:
1 tsp of of salt and pepper to taste
A lemon cut in half
An onion or shallot, cut in half
A head of garlic, cut in half
A bay leaf or two
1/2 cup of olive oil
Optionally 2 tsp of dried herbs – thyme, oregano, or rosemary
Optionally, if you have a carrot or celery kicking around you can add those too
Reduce to low, add a lid slightly ajar, and gently simmer on low for at least 2 hours, longer if you have time, until the beans are soft all the way through. Add more water if needed during the cooking time. Remove the vegetables. Adjust with salt, pepper, and acid.
You can separate the beans from the broth and use them in any recipe that calls for that type of bean. You can use the broth as you would any broth. It will be rich and flavourful. Or you can eat them together as a soup – perfect with olive oil fried bread and some Parmesan.
Beans keep well in the fridge for a 3–5 days. Beans can be frozen in their broth for a long time. Reheat gently.
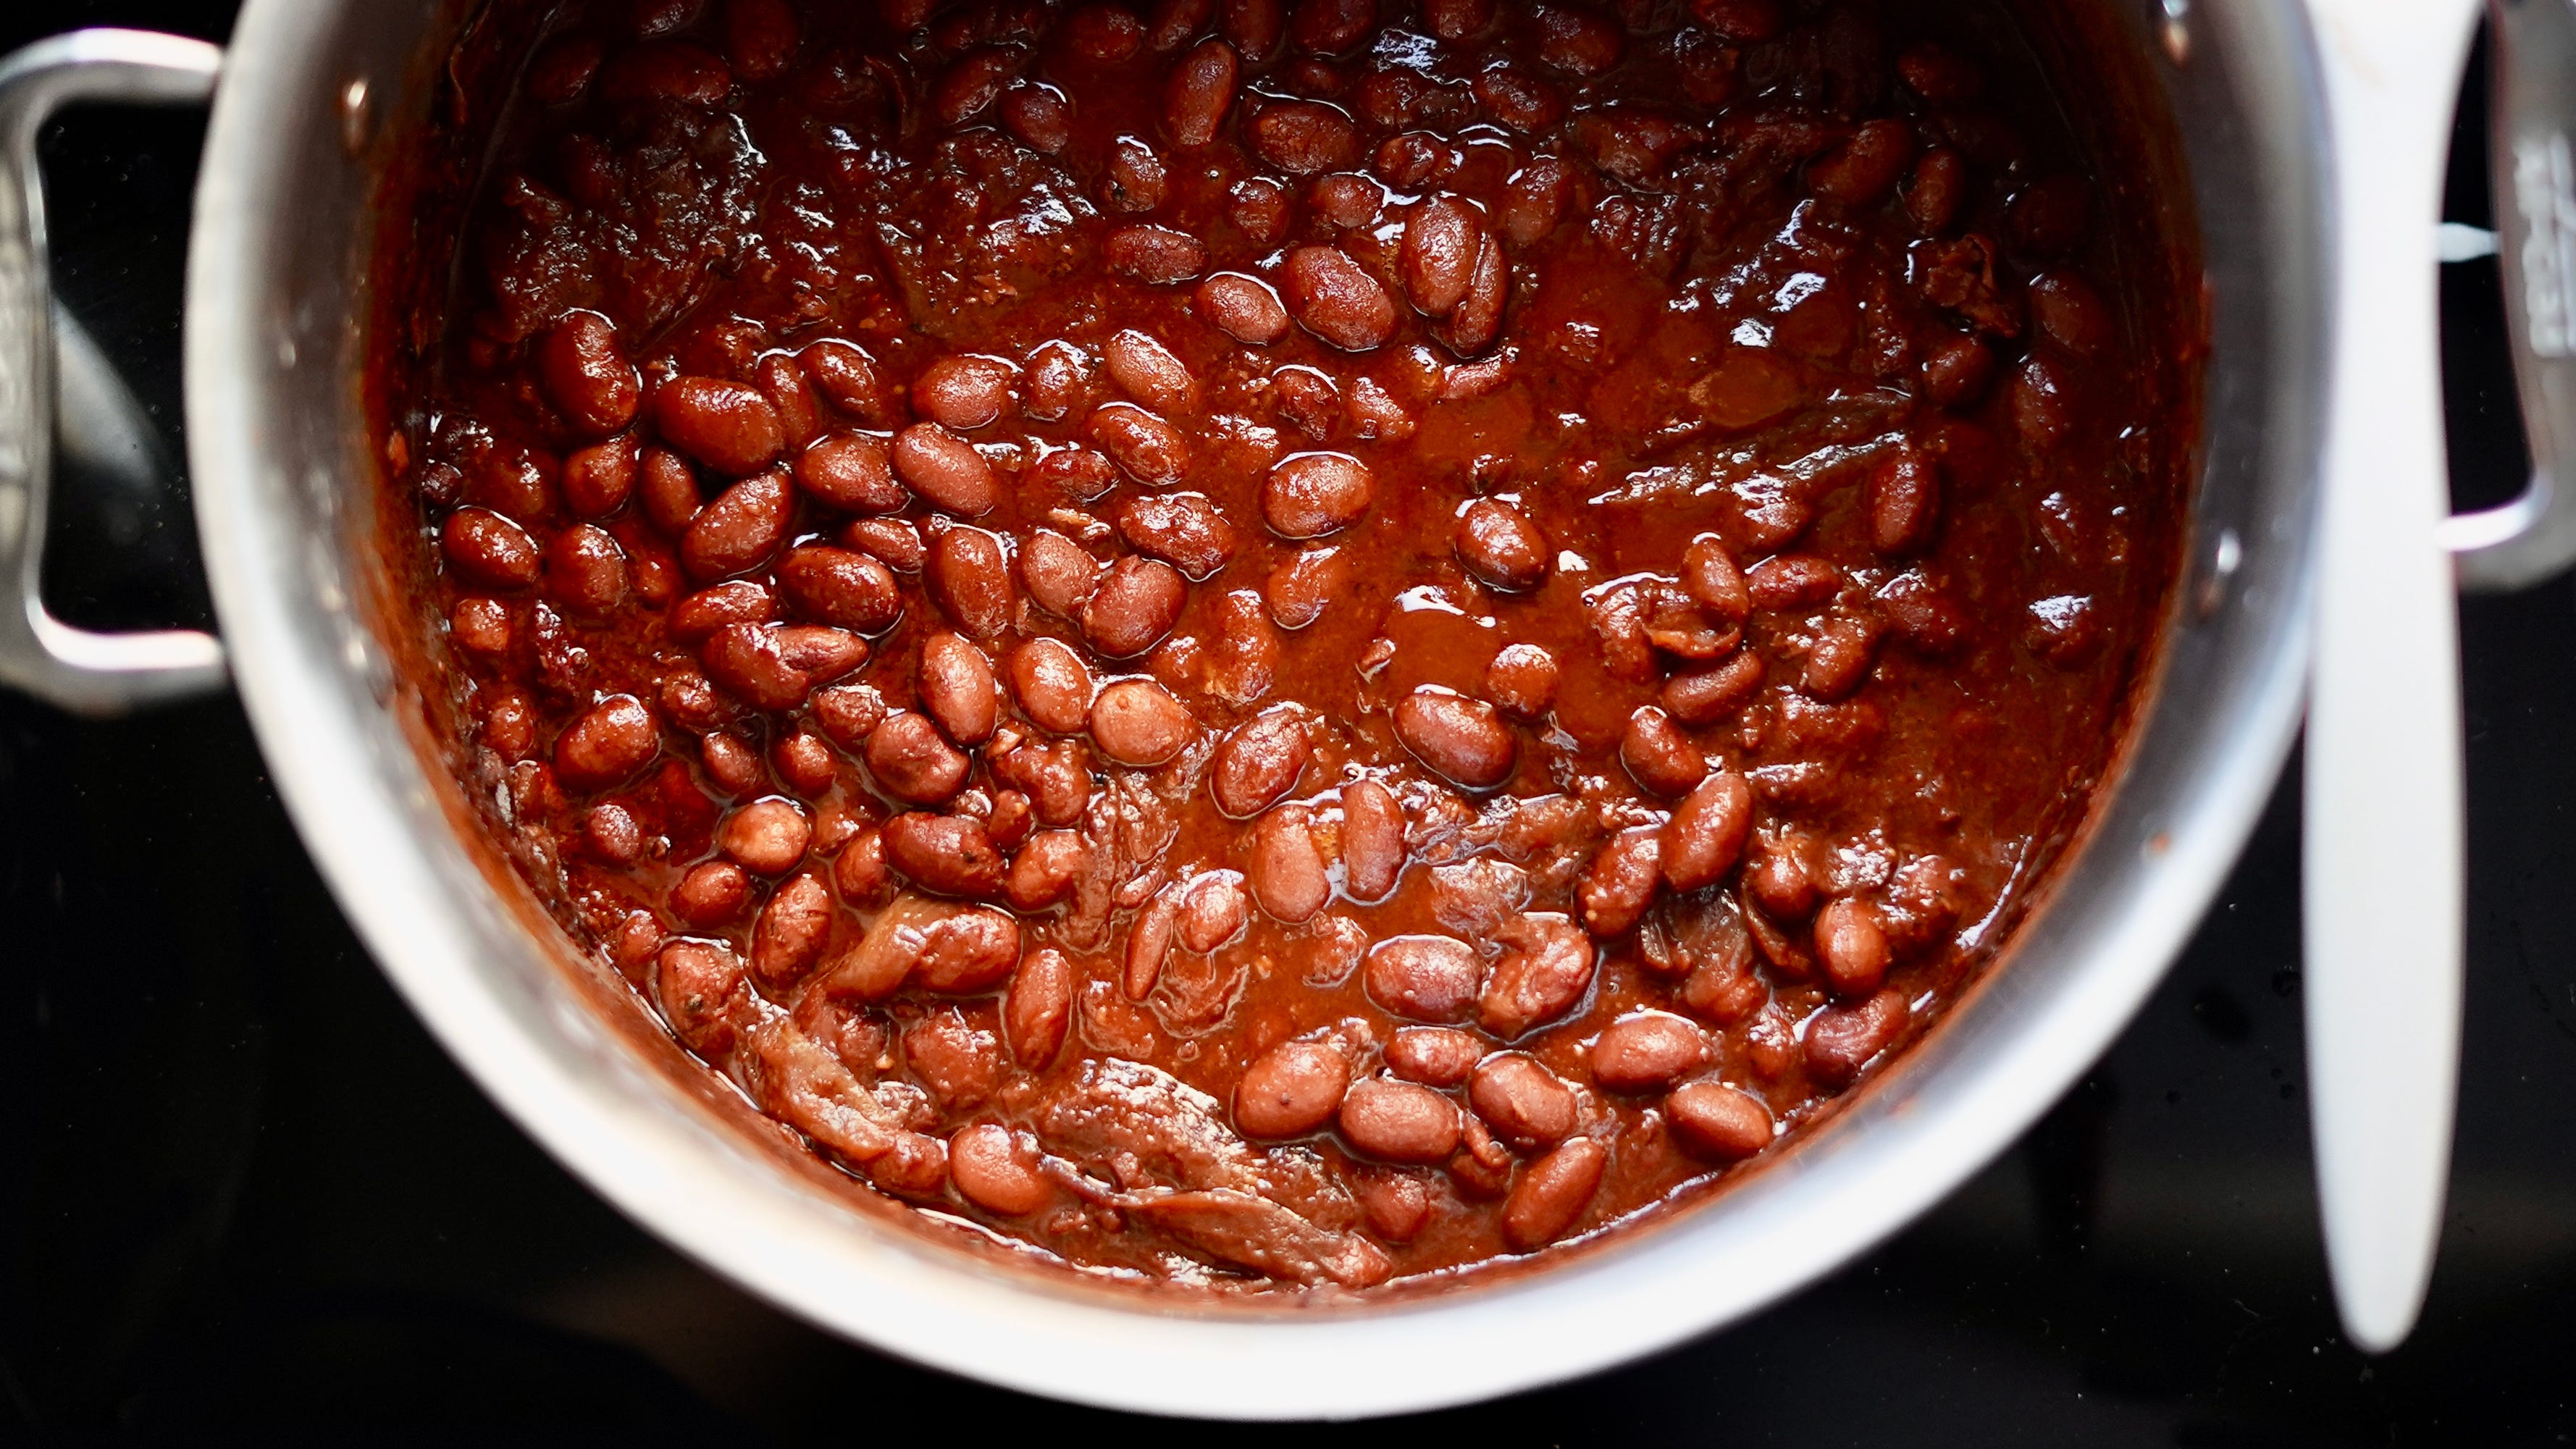
Baked Beans
If you like BBQ sauce, you’ll love home made baked beans. These are so delicious you’ll want them for breakfast, lunch, and dinner. This is a great entry point for learning how good beans can be at home. These are Whipple beans from Rancho Gordo – most often baked beans are made with navy beans (which are white, because food is confusing). If you have a favourite home-made BBQ sauce recipe, that’s a great way to riff on the flavours.
Ingredients
2 medium onions, peeled and cut into quarters
A head of garlic, peeled and smashed
1/2 cup olive oil
1/2 cup molasses (or maple syrup or honey if you’re feeling fancy)
1/4 cup tomato paste
1 tbsp smoked paprika
1 or 2 bay leaves
1 tbsp mustard (I like grainy)
2 tbsp soy sauce
1 tbsp apple cider vinegar
1 tbsp garlic powder
1/2 Tsp chili flake
2 tsp salt
A lot of black pepper
Method
Soak your beans overnight, covered with 2” water, with a piece of kombu (seaweed, to remove the farts through the power of enzymes).
Remove the kombu before cooking.
Transfer the beans and soaking liquid to a large pot. Add more water so the beans are covered by at least 2”. If you missed the part about removing the kombu, remove it now. If you cook it it will become very bitter.
Bring the beans to a boil and skim off the foam (it’s just protein). Reduce to a simmer, then add everything else. If you’ve ever made your own BBQ sauce you’ll recognize the profile, and you can tweak this to your tastes.
Simmer for at least 3 hours, which can be done uncovered on the stove or in the oven at 275°F. The beans should soft and cooked all the way through, and the liquid very thick and sticky. If the liquid evaporates too quickly you can add more water.
Taste the sauce and adjust for salt, heat, sweetness (add brown sugar if sour), and acidity (more ACV if dull/flat/sweet).
Eat with toast, or make a full English, or just devour them out of the bowl like I did while writing these notes. They are addictive.
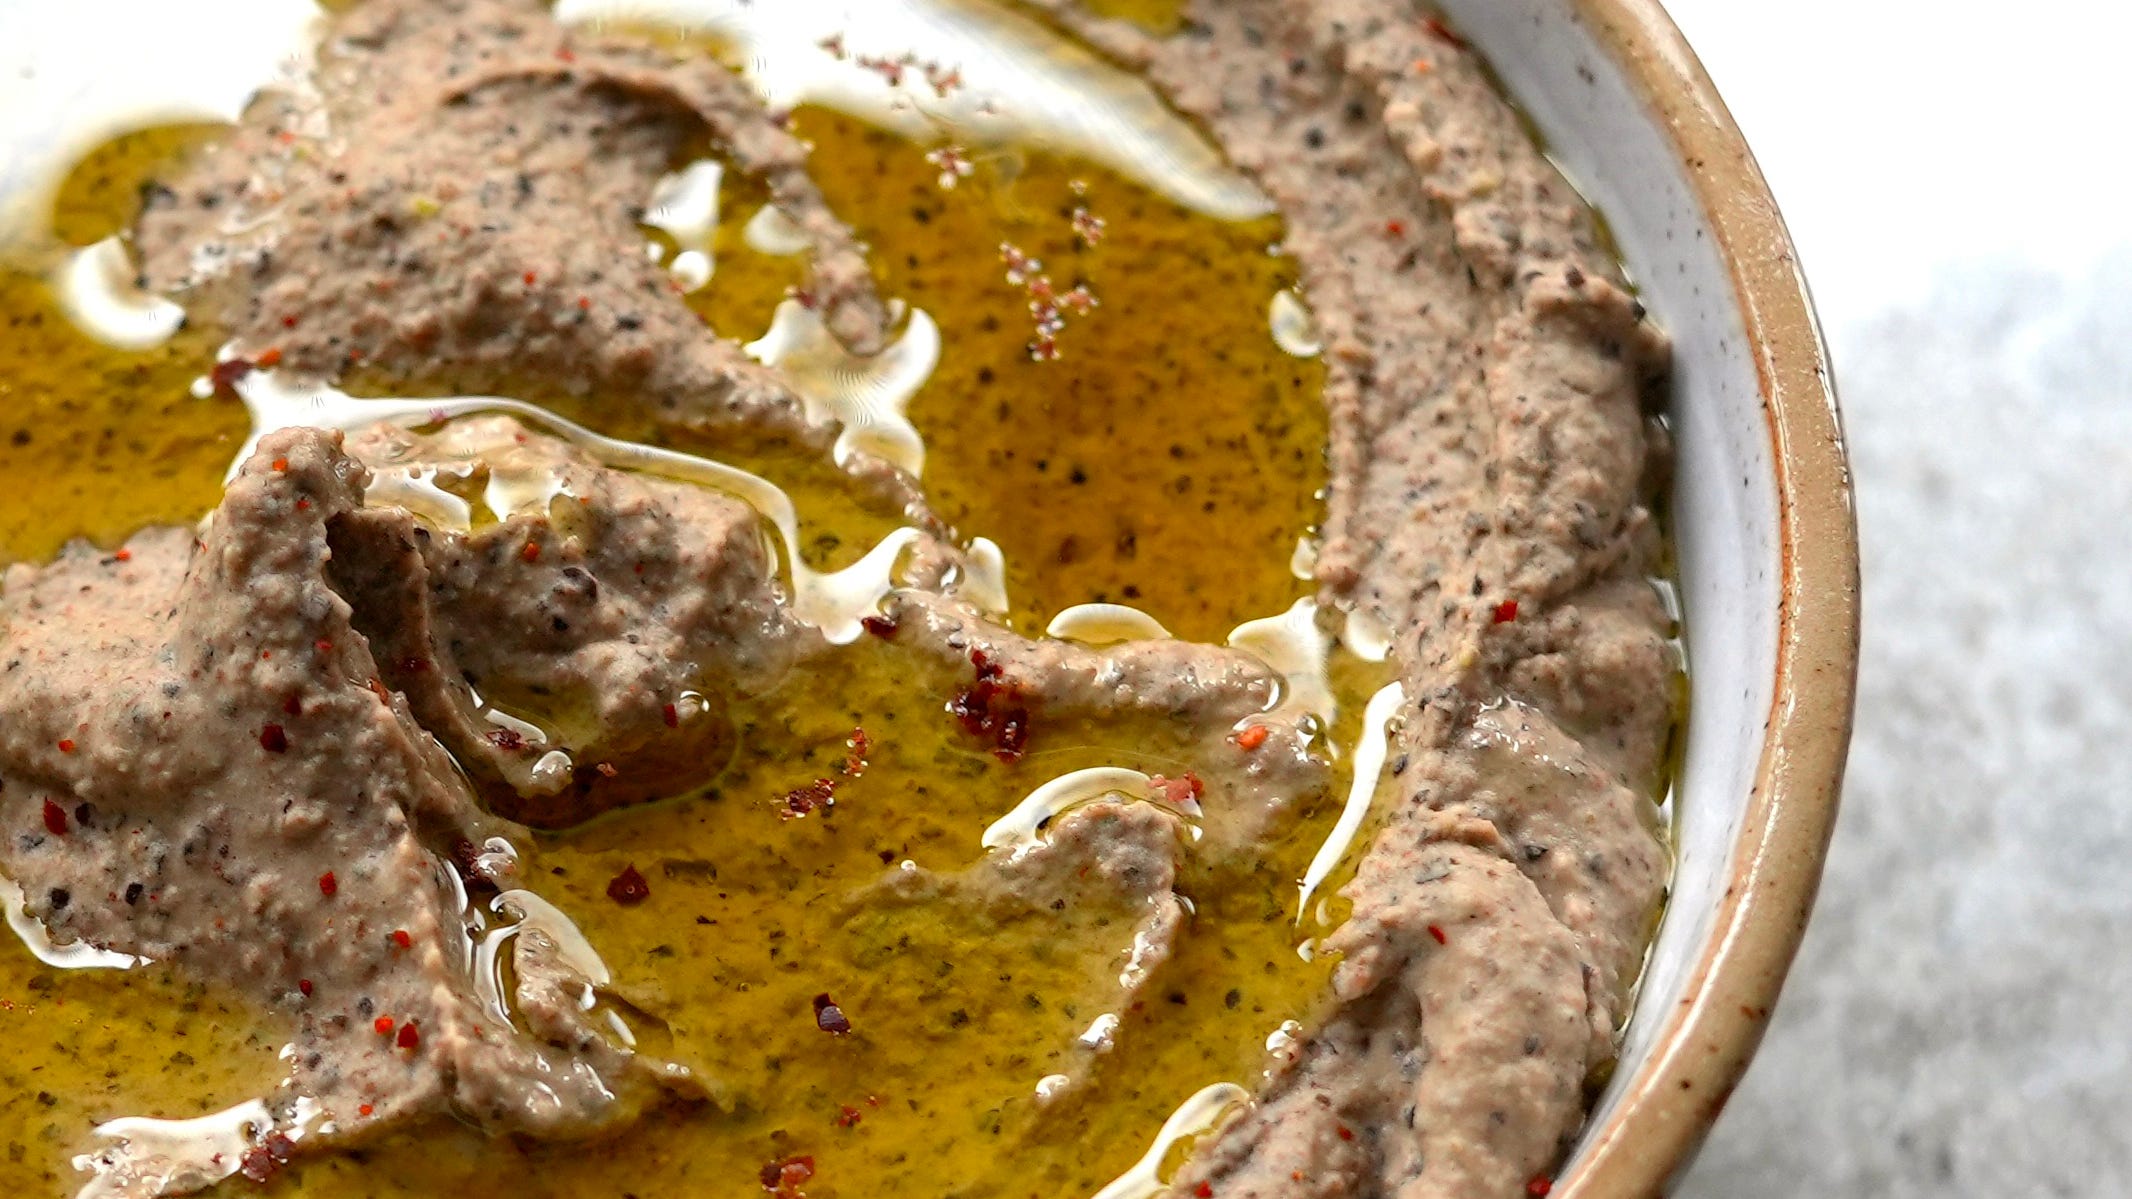
Hummus
I’ve tried what feels like every recipe for hummus. Everyone has their own way. In Kitchener we have a lot of great Middle Eastern restaurants, and everyone has their favourite hummus: Arabesque, for their tahini-forward, thick-but-silky smooth hummus. La Casbah, for their garlic and lemon-forward whipped hummus. Black Market Hummus, which is chickpea-forward and textured. Al Madina’s, which is lemony and deeply flavoured.
I don’t peel my chickpeas, it’s too much work and fiber is good for you. On Home Cooking, Samin Nosrat recommends to use a food processor, not a blender, and to process for a full 2 minutes to get silky smooth hummus – and I can tell you that it works. It’s what I do now. You can use a blender, the blender is easy, but the food processor is superior if you have one.
Cooking your own chickpeas means you can introduce so much more flavour into the hummus. You can also make a large batch of chickpeas at once, save some for salads, for crispy chickpeas, for shakshuka, or freeze them for later. Of course, you can use canned.
Here’s how I make my hummus. You can make your hummus however you like! Please share your hummus in the comments, as we should all be open minded to trying different kinds of hummus. One world, many hummus.
Ingredients:
2 cups of cooked chickpeas (cooked in the brothy bean method, or 1 can)
1/2 cup bean broth (approximately)
1/3 cup tahini
2 garlic cloves (this is garlic-forward, use 1 clove if you’re not a garlic person)
2 tbsp lemon juice
1 tsp salt
1/4 cup good olive oil (for serving)
1 tsp tomato powder (optional)
1 tsp sweet paprika (optional)
Method:
Add the chickpeas, tahini, garlic, lemon juice, and salt in the food processor and blend for 2 minutes. Check your taste and texture:
If it’s too thick, add some bean broth
If it’s too tahini-forward, add more lemon juice
If it’s too lemony, add more tahini
If the garlic is too much, you can add more chickpeas – or embrace the greatness of garlic
Transfer to a bowl and top with good olive oil. Sprinkle with tomato powder and paprika, if using. Optionally top with chopped parsley.
Soy Milk
One of the strangest bean myths is around soybeans and estrogen – it’s a very Western world argument, since half the human population has relied on soybeans for thousands of years without problems. I’m not worried about it.
My bigger concern with soy milk and tofu is the poor quality we have available at grocery stores. I started making my own soy milk and tofu last year because the quality difference is night and day. I detest soy milk from the store, the texture is somehow both thin and gluey, the taste is metallic. It has 40 calories because it’s not soy milk but chemically thickened water. This allows producers to increase their margin by marketing it as a low calorie health food, while only using 25% of the soybeans you would at home.
Home-made soy milk is creamy, nutty, and delicious. Nutritionally, homemade soy milk is comparable to dairy milk – with 7g protein, 4g fat, 8g carbs (1g sugar)… but only if you make it.
And making soy milk is more tedious than oat, almond, or cashew milk – you have to cook it o make it safe to eat. It’s worth it. It is far more nutrient dense – the most protein you can get in a non-dairy milk, with a beautiful texture. It works great in cooking and baking.
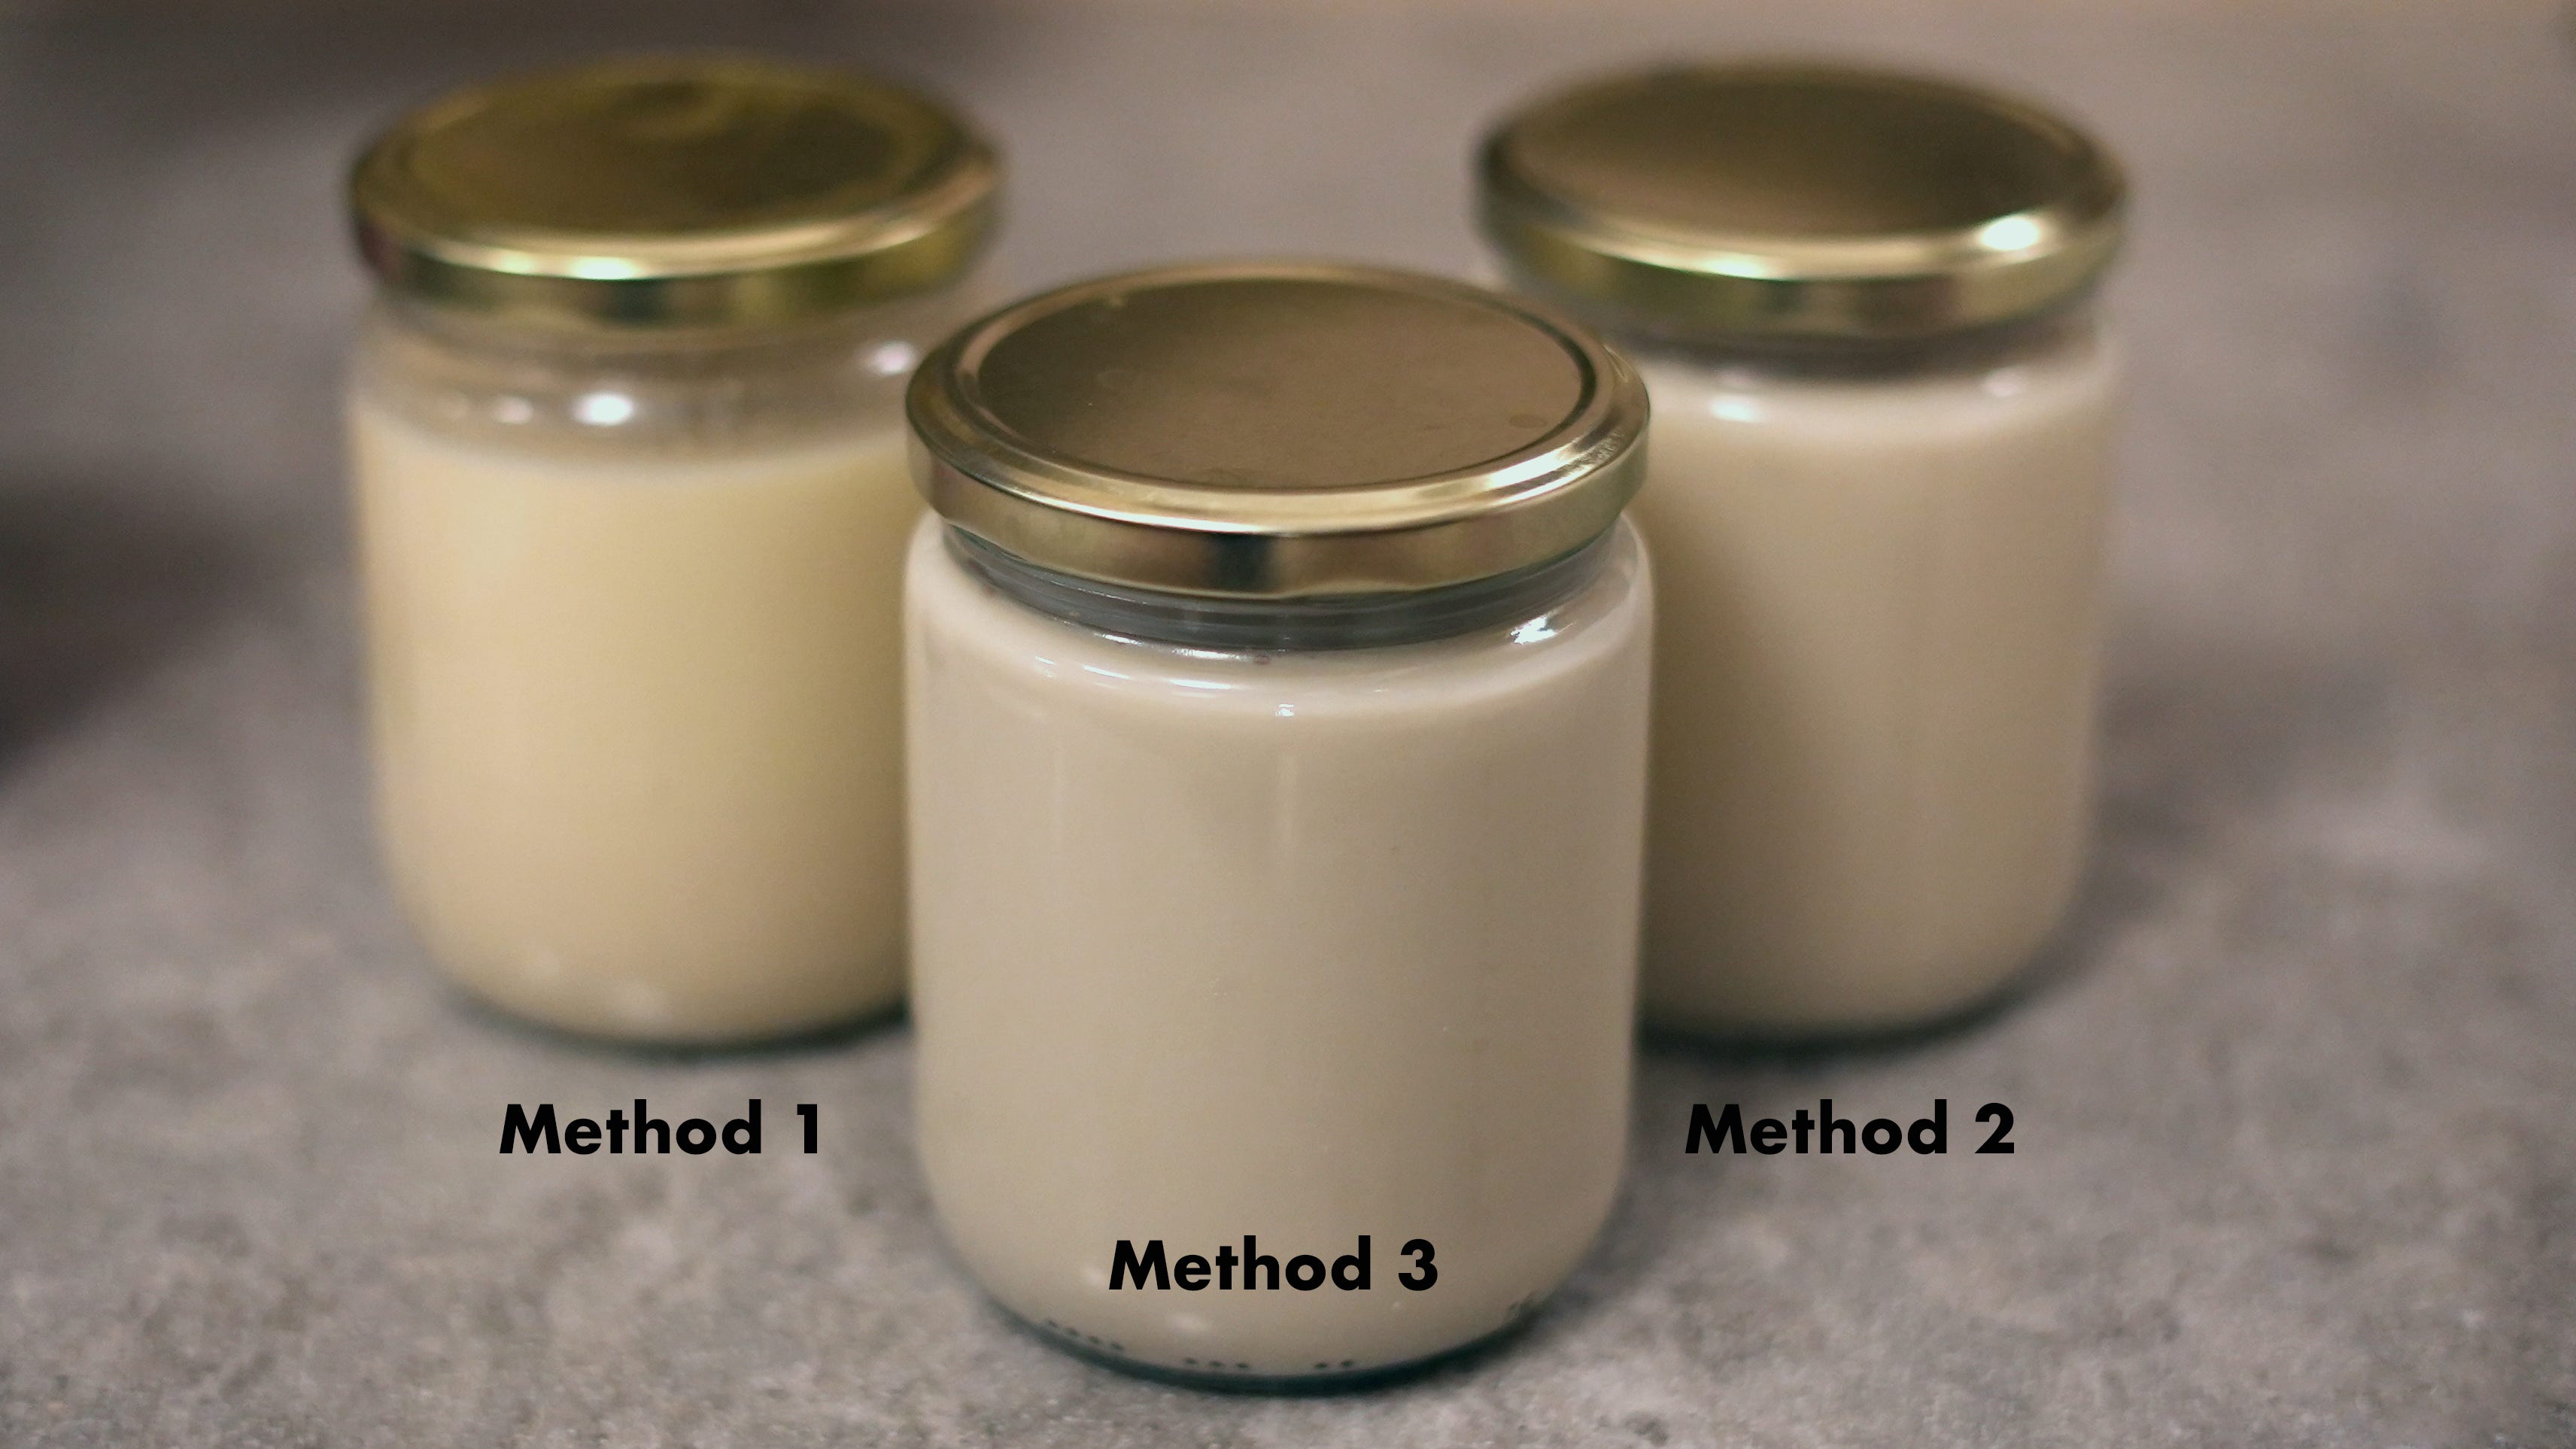
There are three different methods of making soy milk, depending on what intensity of flavour you like. Depending on when you boil the soybeans the flavour will change dramatically.
Method 1: Soy milk with an intense flavour – ideal for tofu
Soak → Boil → Blend → Strain
Boiling whole beans creates a very intense grassy, beany flavour with a rich texture. This is great for making tofu, but not my favourite to drink a glass of soy milk.
Method 2: Soy milk with a balance of texture and flavour
Soak → Blend → Boil → Strain
Boiling puree creates the most luxurious, velvety soy milk with a sweet and intense flavour – it’s not very beany, but it you can tell it is soy milk.
Method 3: Neutral tasting, sweet milk – ideal as a dairy replacement
Soak → Blend → Strain → Boil
Boiling strained milk creates the sweetest, most neutral flavoured soy milk – you can barely tell it is made from beans. If you add a tiny bit of sugar and some vanilla you’d be fooled into thinking its milk.
Soy Milk Recipe
Ingredients
1/2 cup dried yellow soybeans
1 small piece kombu (optional)
Water
To make 1L | 1 quart of soy milk:
Rinse, then soak your soybeans at least 4 hours in cool, clean water that covers the beans by at least 2”. Optionally, add a piece of kombu.
After soaking, remove the kombu, drain the soaking water, and rinse the beans – this helps minimize foaming and reduces bean flavour.
Add your beans to a mixer or food processor with 2 cups of cold water. Blend into a puree.
After blending, add 2 more cups of water and stir (don’t blend!). If you blend with all 4 cups of water the proteins in the soybeans will create a tremendous amount of foam.
Pour the soy mixture through a nut milk bag or fine cheesecloth. The leftover pulp is called Okara, which can be used to add protein and fibre to other dishes like stir fry, or added to baking recipes like muffins. You can also compost it. It goes sour pretty quickly, so if you plan to use it, use it in 1–2 days.
You must cook the soy milk for it to be safe to drink.
Add the strained soy milk to a large pot, bring it to a boil, and reduce to a simmer. Cook for at least 10 minutes. Allow to cool fully.
Optionally, you can add 1 tbsp of sugar and 1 tsp of vanilla extract.
Store soy milk in a glass carafe in the fridge for up to 5 days.
Notes:
Look for organic, non-GMO, Canadian grown yellow soybeans (in Canada). In the US, look for organic Laura soybeans which are a special variety of yellow soybeans that make excellent soy milk (not available in Canada).
With your own soy milk you can also make your own tofu. It’s very similar to making ricotta. The taste and texture is incomparable to the kind you get at the store but it does require a special tofu press and a seawater-based coagulant. If you plan to make your own tofu, try the other cooking methods which create a stronger, beanier flavour.
Full of beans
Bean recipes will continue next week, with my recipe for white bean pot pie with olive oil pastry crust! It’s the best chicken pot pie you’ll ever have, only it’s made from beans.
Marko
I never thought I would say this but now I am longing to make beans. Great post and thanks for including the biggest myth about beans and how to overcome all the gassiness. Thanks Marko! :)